
FIRST STEP: PREPARE THE DOUGH
- Mix the Dry Ingredients: In a large mixing bowl, combine the flour, baking powder, salt, ground cumin, and ground coriander. Stir the dry ingredients together to ensure they’re evenly distributed.
- Add the Wet Ingredients: Add the cottage cheese, yogurt, and olive oil (or ghee) to the dry mixture. Use your hands or a spoon to combine the ingredients, gradually working them into a dough. You might need to adjust the consistency by adding a bit more flour or yogurt, depending on the moisture in the cottage cheese.
- Knead the Dough: Once the ingredients are combined, transfer the dough to a floured surface and knead it for 5-7 minutes, or until it becomes smooth and elastic. If the dough feels too sticky, sprinkle in a little more flour.
- Rest the Dough: Cover the dough with a clean kitchen towel or plastic wrap and let it rest for 15-20 minutes. This allows the gluten to relax and makes it easier to roll out.
SECOND STEP: DIVIDE AND ROLL OUT
- Divide the Dough: After resting, divide the dough into 8-10 equal-sized portions. Roll each portion into a ball using your hands.
- Roll the Dough: On a floured surface, take one dough ball and roll it out into a thin circle, about 6-8 inches in diameter. The dough should be soft but not too sticky. If it sticks to the rolling pin, dust it lightly with flour.
- Repeat for the Remaining Dough: Continue rolling out the remaining dough balls. You can stack them on top of each other, separated by a layer of parchment paper, to keep them from sticking while you cook them.
THIRD STEP: COOK THE FLATBREAD
- Heat the Pan: Heat a large non-stick skillet or griddle over medium-high heat. Once the pan is hot, add a small amount of olive oil or ghee, spreading it evenly over the surface.
- Cook the Flatbread: Place the rolled-out flatbread onto the hot pan. Cook for about 2-3 minutes on one side, or until bubbles start to form on the surface. Flip the flatbread over and cook for another 1-2 minutes, or until golden brown spots appear. The flatbread should puff slightly as it cooks.
- Repeat: Remove the cooked flatbread from the pan and set it aside. Continue cooking the remaining flatbreads, adding more oil or ghee to the pan as needed.
FOURTH STEP: SERVE
- Serve Immediately: Once all the flatbreads are cooked, serve them warm. You can garnish them with fresh herbs, a sprinkle of sesame seeds, or a drizzle of olive oil for extra flavor.
- Enjoy with Your Favorite Dips: Cottage Cheese Flatbread is perfect when served with yogurt, hummus, tahini, or any of your favorite dips. It also pairs wonderfully with stews, grilled meats, and roasted vegetables.
Introduction
If you’re craving a sweet treat that’s both healthy and easy to make, look no further than air fried bananas. This simple yet delicious dessert takes advantage of the air fryer to create perfectly caramelized bananas with a crisp exterior and a soft, sweet interior. Air frying offers a healthier alternative to traditional frying, using less oil but still achieving that golden-brown crispiness. Whether you’re looking for a quick snack or a decadent dessert, air fried bananas are the perfect choice. With their naturally sweet flavor and comforting texture, these bananas are an excellent choice for anyone seeking a warm, guilt-free indulgence.
In this article, we’ll explore why air fried bananas are a must-try dessert, provide a step-by-step guide to making them, and share variations to help you customize this treat. You’ll also learn how to serve and store your air fried bananas for optimal enjoyment. Whether you enjoy them on their own or paired with other ingredients, air fried bananas are sure to satisfy your sweet tooth with ease.
Why You’ll Love This Recipe
- Quick and Easy: Air fried bananas are incredibly easy to make, requiring minimal ingredients and only a few minutes of prep time.
- Healthier Option: Unlike deep frying, air frying uses less oil, making this dessert a healthier alternative without sacrificing taste or texture.
- Naturally Sweet: Bananas are naturally sweet, and air frying enhances their sweetness, making them perfect for a satisfying dessert without the need for added sugars.
- Versatile: You can customize the recipe with various toppings or mix-ins like honey, cinnamon, or coconut for added flavor.
- Suitable for All Diets: This recipe is Halal-friendly, gluten-free, and can be adapted to various dietary needs, making it a great choice for anyone.
Preparation Time and Servings
- Total Time: 15 minutes (5 minutes for prep, 10 minutes for air frying)
- Servings: This recipe makes 2 servings, but you can easily adjust the quantities to make more.
- Nutrition Facts (per serving): Calories: 150, Protein: 1g, Carbs: 40g, Fat: 0g, Fiber: 3g
Ingredients
For the Air Fried Bananas:
- 2 ripe bananas: Choose bananas that are ripe but not overripe, as they will provide the best texture and sweetness.
- 1 tablespoon olive oil or coconut oil: For brushing the bananas to help them crisp up in the air fryer.
- 1 teaspoon ground cinnamon (optional): Adds warmth and depth to the bananas, enhancing their natural sweetness.
- 1 tablespoon honey or maple syrup (optional): Adds an extra touch of sweetness and helps create a caramelized coating.
- A pinch of salt (optional): Balances the sweetness and enhances the flavor.
Optional Toppings:
- Chopped nuts (such as almonds, walnuts, or pistachios): For a crunchy contrast to the soft bananas.
- Greek yogurt or dairy-free yogurt: Adds creaminess and a refreshing contrast to the warm bananas.
- Shredded coconut: For extra flavor and texture.
- Fresh berries: To add a burst of color and a fresh, tart contrast to the sweetness of the bananas.
Step-by-Step Preparation
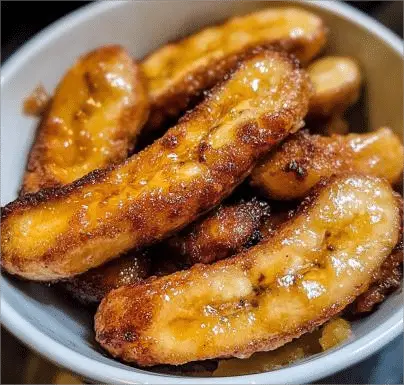
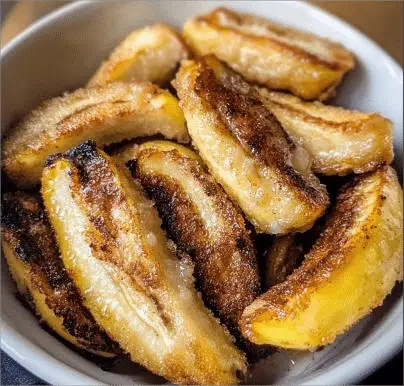
FIRST STEP: PREPARE THE BANANAS
- Peel the Bananas: Start by peeling the bananas. Choose ripe bananas that are firm, but not too soft or overly ripe. If the bananas are too ripe, they may turn mushy in the air fryer.
- Slice the Bananas: Slice the bananas into 1/2-inch thick rounds or lengthwise, depending on your preference. Round slices work well for a quick, bite-sized treat, while lengthwise slices provide a more elegant presentation.
- Season the Bananas: If desired, sprinkle the banana slices with cinnamon and a pinch of salt. The cinnamon will enhance the sweetness of the bananas and provide a warm, comforting flavor. You can also drizzle a small amount of honey or maple syrup for added sweetness.
SECOND STEP: AIR FRY THE BANANAS
- Preheat the Air Fryer: Preheat your air fryer to 350°F (175°C). Preheating helps ensure even cooking and crispiness.
- Brush with Oil: Lightly brush the banana slices with olive oil or coconut oil. This step helps the bananas crisp up in the air fryer and gives them a golden-brown color.
- Arrange the Bananas in the Air Fryer Basket: Arrange the banana slices in a single layer in the air fryer basket. Be sure not to overcrowd the basket, as this will prevent the bananas from crisping evenly. If necessary, cook the bananas in batches.
- Air Fry the Bananas: Air fry the banana slices for 6-8 minutes, flipping halfway through. The bananas should become golden brown and slightly caramelized. Keep an eye on them to avoid overcooking, as bananas can soften quickly in the air fryer.
THIRD STEP: SERVE AND GARNISH
- Transfer to a Plate: Once the bananas are done, carefully remove them from the air fryer and place them on a serving plate.
- Add Toppings: This is the fun part—add your desired toppings. You can sprinkle the bananas with chopped nuts for added texture, drizzle with more honey or maple syrup for extra sweetness, or top with a dollop of Greek yogurt for a creamy contrast.
- Serve Immediately: Air fried bananas are best served immediately while they’re still warm. The caramelized exterior and soft interior make for a delightful treat that’s perfect for any occasion.
How to Serve Air Fried Bananas
Air fried bananas are a versatile treat that can be enjoyed in various ways. Here are some great serving ideas:
1. As a Quick Snack or Dessert
Air fried bananas are perfect for a quick snack or a simple dessert. Their natural sweetness and crispy texture make them a satisfying choice for those craving something light and healthy. Serve them on their own or pair them with a light yogurt dip for added richness.
2. With Ice Cream or Sorbet
For a more indulgent treat, serve your air fried bananas with a scoop of vanilla ice cream or fruit sorbet. The cold, creamy ice cream contrasts wonderfully with the warm, caramelized bananas, creating a perfect balance of temperatures and textures.
3. On Pancakes or Waffles
Air fried bananas can be used as a topping for pancakes or waffles. The bananas will add sweetness and flavor to your breakfast or brunch, and you can even drizzle them with syrup for an extra treat.
4. As a Healthy Breakfast Option
Combine air fried bananas with a bowl of oatmeal or granola for a healthy and filling breakfast. The bananas add natural sweetness, while the other components provide fiber and protein to start your day on a nutritious note.
5. As a Party Appetizer
Air fried bananas can also be served as part of a sweet appetizer spread at parties or gatherings. Pair them with fresh fruit, nuts, and cheese for a unique and flavorful platter that will impress your guests.
Recipe Variations
While the basic air fried banana recipe is fantastic on its own, there are several ways to customize it to your taste. Here are some variations to try:
1. Add Spices
Experiment with different spices to create new flavor profiles. You can try adding nutmeg, allspice, or cardamom to the cinnamon for a more aromatic taste. These spices will enhance the natural sweetness of the bananas and give them a warm, cozy feel.
2. Use Different Oils
While olive oil or coconut oil works wonderfully for this recipe, you can experiment with other oils like avocado oil or grapeseed oil. Each oil has a subtle flavor that can complement the bananas in different ways.
3. Stuff the Bananas
For a more indulgent treat, stuff the banana slices with a filling like peanut butter, almond butter, or Nutella before air frying them. This adds extra richness and flavor to the bananas and makes for a more decadent dessert.
4. Make It Vegan
To make the recipe vegan-friendly, simply skip the honey or replace it with maple syrup. You can also use dairy-free yogurt as a topping to make it fully plant-based.
5. Add Chocolate
For chocolate lovers, drizzle melted chocolate over the air fried bananas or serve them with a side of chocolate sauce for dipping. The combination of warm bananas and rich chocolate is a match made in heaven.
Freezing and Storage
Air fried bananas are best enjoyed fresh, but if you have leftovers, you can store them for later:
Storing Leftovers:
Place leftover air fried bananas in an airtight container and store them in the refrigerator for up to 2 days. To reheat, you can place them in the air fryer for 2-3 minutes to warm them up and restore their crispiness.
Freezing:
You can also freeze air fried bananas for longer storage. After air frying, allow the bananas to cool completely before placing them in a single layer on a baking sheet. Freeze them for 1-2 hours until firm, then transfer to a freezer-safe bag or container. To reheat, air fry the frozen bananas for 5-6 minutes at 350°F (175°C).
Special Equipment
While you don’t need many special tools to make air fried bananas, having an air fryer is essential. Here are some other helpful kitchen tools:
- Air Fryer: The key equipment for making air fried bananas with a crispy exterior.
- Baking Sheet (for freezing): If you’re freezing the bananas, a baking sheet will help prevent them from sticking together.
- Brush: To lightly coat the bananas with oil before air frying.
Frequently Asked Questions
- Can I use overripe bananas? It’s best to use ripe bananas, but slightly overripe bananas can still work well. Just keep in mind they may become a bit mushy when air fried.
- Can I air fry frozen bananas? Yes! You can air fry frozen bananas, but they may need a few extra minutes to cook through and become crispy.
- Can I add nuts to the bananas before air frying? You can sprinkle chopped nuts over the bananas before air frying, but be sure to watch them closely as nuts can burn quickly in the air fryer.
- Are air fried bananas suitable for a Halal diet? Yes, this recipe is completely Halal-friendly, as it uses no pork or alcohol-based ingredients.

Air Fried Bananas
- Total Time: 15minutes
Ingredients
For the Air Fried Bananas:
- 2 ripe bananas: Choose bananas that are ripe but not overripe, as they will provide the best texture and sweetness.
- 1 tablespoon olive oil or coconut oil: For brushing the bananas to help them crisp up in the air fryer.
- 1 teaspoon ground cinnamon (optional): Adds warmth and depth to the bananas, enhancing their natural sweetness.
- 1 tablespoon honey or maple syrup (optional): Adds an extra touch of sweetness and helps create a caramelized coating.
- A pinch of salt (optional): Balances the sweetness and enhances the flavor.
Optional Toppings:
- Chopped nuts (such as almonds, walnuts, or pistachios): For a crunchy contrast to the soft bananas.
- Greek yogurt or dairy-free yogurt: Adds creaminess and a refreshing contrast to the warm bananas.
- Shredded coconut: For extra flavor and texture.
- Fresh berries: To add a burst of color and a fresh, tart contrast to the sweetness of the bananas.
Instructions
FIRST STEP: PREPARE THE BANANAS
- Peel the Bananas: Start by peeling the bananas. Choose ripe bananas that are firm, but not too soft or overly ripe. If the bananas are too ripe, they may turn mushy in the air fryer.
- Slice the Bananas: Slice the bananas into 1/2-inch thick rounds or lengthwise, depending on your preference. Round slices work well for a quick, bite-sized treat, while lengthwise slices provide a more elegant presentation.
- Season the Bananas: If desired, sprinkle the banana slices with cinnamon and a pinch of salt. The cinnamon will enhance the sweetness of the bananas and provide a warm, comforting flavor. You can also drizzle a small amount of honey or maple syrup for added sweetness.
SECOND STEP: AIR FRY THE BANANAS
- Preheat the Air Fryer: Preheat your air fryer to 350°F (175°C). Preheating helps ensure even cooking and crispiness.
- Brush with Oil: Lightly brush the banana slices with olive oil or coconut oil. This step helps the bananas crisp up in the air fryer and gives them a golden-brown color.
- Arrange the Bananas in the Air Fryer Basket: Arrange the banana slices in a single layer in the air fryer basket. Be sure not to overcrowd the basket, as this will prevent the bananas from crisping evenly. If necessary, cook the bananas in batches.
- Air Fry the Bananas: Air fry the banana slices for 6-8 minutes, flipping halfway through. The bananas should become golden brown and slightly caramelized. Keep an eye on them to avoid overcooking, as bananas can soften quickly in the air fryer.
THIRD STEP: SERVE AND GARNISH
- Transfer to a Plate: Once the bananas are done, carefully remove them from the air fryer and place them on a serving plate.
- Add Toppings: This is the fun part—add your desired toppings. You can sprinkle the bananas with chopped nuts for added texture, drizzle with more honey or maple syrup for extra sweetness, or top with a dollop of Greek yogurt for a creamy contrast.
- Serve Immediately: Air fried bananas are best served immediately while they’re still warm. The caramelized exterior and soft interior make for a delightful treat that’s perfect for any occasion.
- Prep Time: 5minutes
- Cook Time: 10minutes
Nutrition
- Serving Size: 2
- Calories: 150
- Fat: 0g
- Carbohydrates: 40g
- Fiber: 3g
- Protein: 1g
Conclusion
Air fried bananas are a simple, healthy, and delicious dessert that can be enjoyed by anyone. With their naturally sweet flavor and crispy texture, they make for an easy treat that’s perfect for any occasion. Whether you enjoy them on their own or dressed up with toppings, air fried bananas offer a satisfying balance of sweetness and comfort. Try this recipe today and discover how easy it is to create a warm, flavorful dessert that everyone will love!