

Discover the Kitchen Tool Everyone Is Raving About!
- • Precision Engineered: Sharp blade with durable craftsmanship.
- • Comfort First: Ergonomic design for effortless slicing.
- • Stylish & Strong: Elegant wood handle meets stainless steel strength.
- • Risk-Free Pick: Thousands of happy home chefs can’t be wrong.
- • Today’s Deal: Just $29.95 instead of $99.85 — limited-time offer!
This post may include affiliate links — learn more here .
Introduction
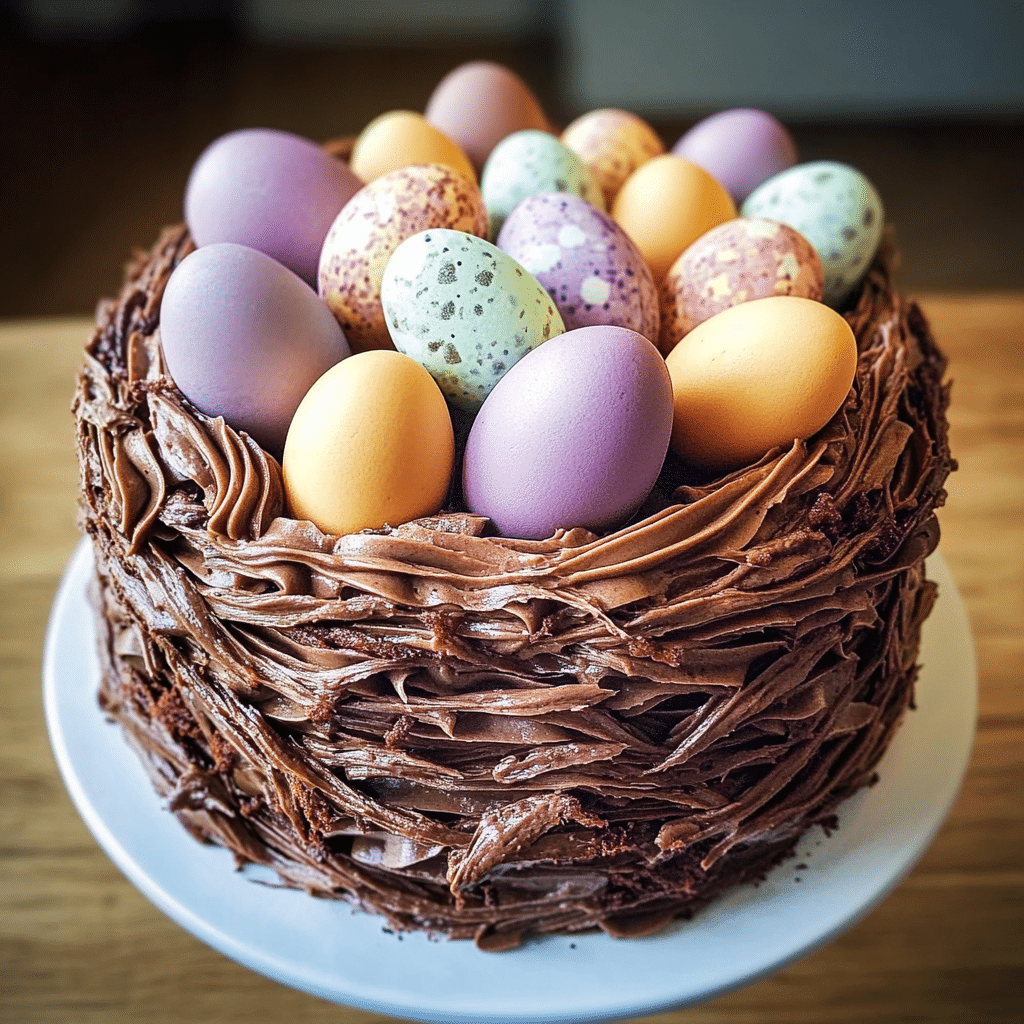
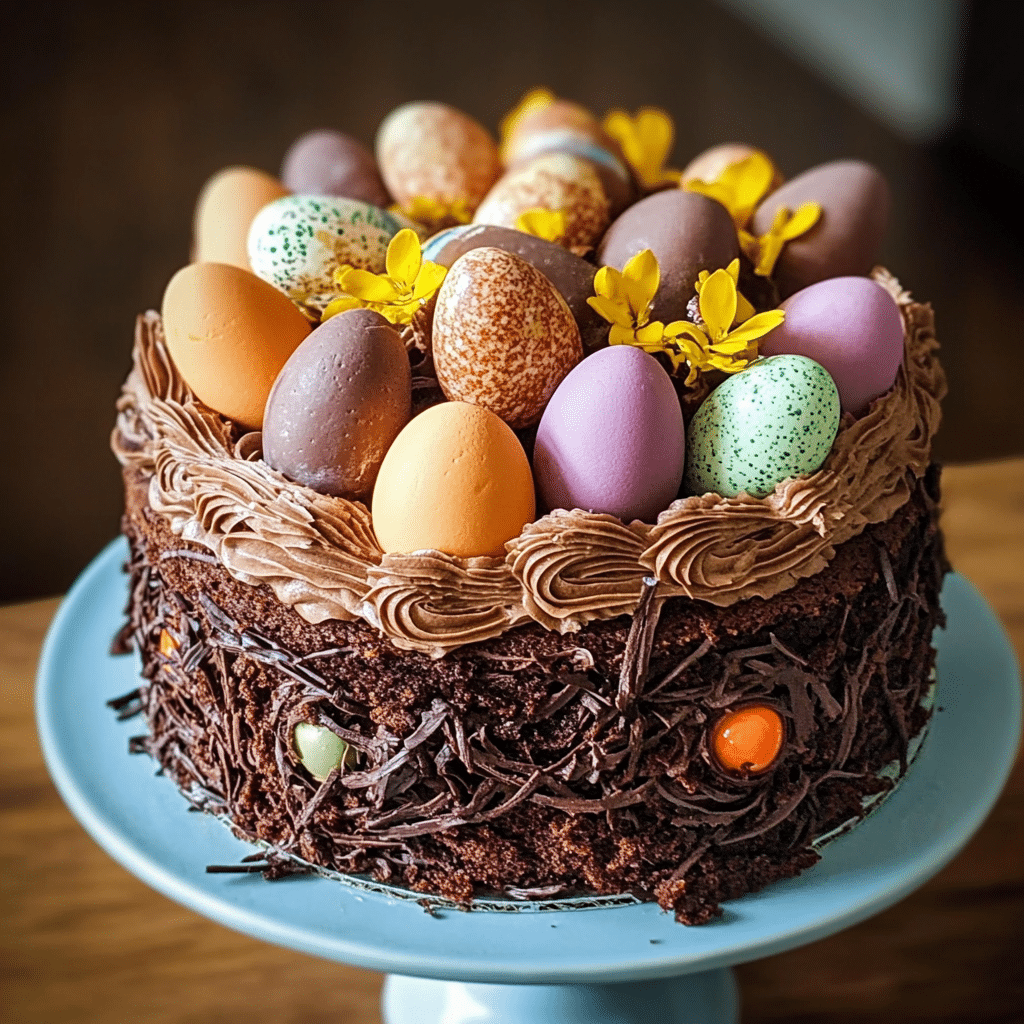
Chocolate Easter Egg Nest Cake is a delightful dessert that celebrates the spirit of Easter with its rich chocolate flavor and charming nest-like design. This cake features layers of moist chocolate sponge, creamy frosting, and colorful Easter egg candies on top, creating a festive and delicious treat. Whether you’re planning a special Easter celebration or just looking to indulge in a unique dessert, this cake will undoubtedly be a showstopper. It’s a fun and easy-to-make cake that adds a touch of whimsy to your holiday table.
Perfect for:
- Easter gatherings
- Holiday celebrations
- Family baking projects
- Special dessert tables
- Chocolate lovers
Why You’ll Love This Recipe: Chocolate Easter Egg Nest Cake
Here’s why Chocolate Easter Egg Nest Cake will become your go-to dessert for Easter and beyond:
- Rich Chocolate Flavor: This cake boasts a rich, decadent chocolate flavor that will satisfy any chocolate craving, from the moist sponge to the creamy frosting.
- Fun and Festive: The nest design, adorned with mini Easter eggs, makes it a perfect centerpiece for any Easter celebration, delighting both kids and adults alike.
- Simple and Easy: Despite its intricate look, this cake is relatively simple to make with just a few ingredients and minimal baking skills required.
- Customizable: You can easily personalize this cake by using different types of chocolate or candy, making it unique to your celebration.
- Halal-Friendly: This recipe is entirely Halal, free of pork, bacon, and alcohol, making it suitable for everyone to enjoy without worry.
Preparation and Cooking Time
- Total Time: 1 hour 30 minutes
- Preparation Time: 20 minutes
- Baking Time: 25-30 minutes
- Cooling Time: 20-30 minutes
- Servings: 12-16 slices
- Calories per serving: Approximately 350-400 calories
- Key Nutrients: Protein: 4g, Carbs: 50g, Fat: 20g
Ingredients for Chocolate Easter Egg Nest Cake
For this decadent dessert, you’ll need the following ingredients:
Chocolate Sponge Cake:
- 1 ¾ cups all-purpose flour
- 1 cup unsweetened cocoa powder
- 1 ½ teaspoons baking powder
- ½ teaspoon baking soda
- 1 teaspoon salt
- 1 cup granulated sugar
- 1 cup brown sugar, packed
- 2 large eggs
- 1 cup buttermilk (or regular milk)
- ½ cup vegetable oil
- 1 teaspoon vanilla extract
- 1 cup boiling water
Chocolate Frosting:
- 1 cup unsalted butter, softened
- 2 cups powdered sugar
- 1 cup unsweetened cocoa powder
- 2 teaspoons vanilla extract
- 2-3 tablespoons milk (or as needed)
- A pinch of salt
Nest Decoration:
- 1 cup shredded coconut (optional)
- 1 ½ cups mini chocolate eggs (such as Easter egg candies or chocolate-covered almonds)
- Small chocolate shavings (optional, for extra texture)
Ingredient Highlights
- Cocoa Powder: The unsweetened cocoa powder gives the cake its deep, rich chocolate flavor.
- Buttermilk: Buttermilk adds moisture to the sponge and ensures a light, airy texture.
- Shredded Coconut: Toasted shredded coconut can mimic the look of a nest, adding both texture and a touch of sweetness.
- Mini Easter Eggs: The colorful chocolate eggs are the star of the decoration, bringing a fun and festive look to your dessert.
- Butter: The creamy butter in the frosting helps to create a smooth and rich texture, making the frosting the perfect complement to the cake.
Step-by-Step Instructions

Follow these simple steps to create your own Chocolate Easter Egg Nest Cake:
Prepare the Chocolate Cake Batter for Chocolate Easter Egg Nest Cake:
- Preheat the Oven: Preheat your oven to 350°F (175°C). Grease and flour two 8-inch round cake pans or line them with parchment paper to prevent sticking.
- Combine the Dry Ingredients: In a large bowl, sift together the flour, cocoa powder, baking powder, baking soda, and salt. Set aside.
- Mix the Wet Ingredients: In another large bowl, whisk together the granulated sugar, brown sugar, eggs, buttermilk, vegetable oil, and vanilla extract. Stir until well combined.
- Add Dry Ingredients to Wet: Gradually add the dry ingredients to the wet mixture, mixing until just combined. Be careful not to overmix.
- Add Boiling Water: Stir in the boiling water to the batter. This will thin the batter, making it more like a liquid than a traditional cake batter, but don’t worry—it’s the key to a moist cake.
Bake the Chocolate Sponge Cake:
- Pour the Batter into Pans: Divide the batter evenly between the prepared cake pans.
- Bake: Bake for 25-30 minutes, or until a toothpick inserted into the center of the cake comes out clean or with a few moist crumbs. The cakes should be springy to the touch.
- Cool the Cakes: Allow the cakes to cool in the pans for about 10 minutes before transferring them to a wire rack to cool completely.
Prepare the Chocolate Frosting for Chocolate Easter Egg Nest Cake:
- Make the Frosting: In a large mixing bowl, beat the softened butter until creamy. Gradually add the powdered sugar and cocoa powder, mixing until smooth.
- Add Milk and Vanilla: Add 2 tablespoons of milk and the vanilla extract, and beat until the frosting reaches a spreadable consistency. If it’s too thick, add an extra tablespoon of milk; if it’s too thin, add a bit more powdered sugar.
- Frost the Cake: Once the cakes have cooled, place the first cake layer on a serving plate. Spread a layer of frosting on top. Add the second layer of cake and cover the entire cake with the frosting, smoothing it out with a spatula.
Create the Nest Design for Chocolate Easter Egg Nest Cake:
- Toast the Coconut: If using shredded coconut, place it in a dry skillet over medium heat and stir constantly until it’s lightly golden and fragrant. Set aside to cool.
- Decorate the Cake: Carefully arrange the toasted coconut (or you can leave it plain) in a circular pattern on top of the cake to mimic the look of a nest.
- Add the Mini Easter Eggs: Place the mini chocolate eggs in the center of the coconut “nest” or sprinkle them around the cake as desired.
- Optional Decoration: You can add chocolate shavings around the cake’s edge or use extra frosting to pipe decorative designs.
Cut and Serve Chocolate Easter Egg Nest Cake:
- Serve: Once the cake is decorated, it’s time to cut into it and enjoy. Serve the Chocolate Easter Egg Nest Cake chilled or at room temperature for a perfect Easter treat.
How to Serve Chocolate Easter Egg Nest Cake
Chocolate Easter Egg Nest Cake is versatile and can be served in various ways:
- With Ice Cream: Serve this cake warm with a scoop of vanilla ice cream for a decadent dessert experience.
- As a Centerpiece: The stunning nest design makes it a great centerpiece for an Easter dinner or brunch.
- With Coffee or Tea: This rich chocolate cake pairs perfectly with a cup of hot coffee or tea, making it a great afternoon treat.
- For Easter Gatherings: Bring it to family gatherings or Easter egg hunts to impress your guests with a visually stunning and delicious cake.
Additional Tips for Chocolate Easter Egg Nest Cake
Here are some tips to ensure your Chocolate Easter Egg Nest Cake turns out perfectly:
- Don’t Overmix the Batter: Overmixing the cake batter can result in a dense cake. Mix until just combined for the best texture.
- Use High-Quality Cocoa Powder: For the richest flavor, use a high-quality unsweetened cocoa powder.
- Cool the Cakes Completely: Make sure the cakes have cooled completely before frosting to avoid the frosting melting.
- Customize the Decorations: You can switch up the candy on top by using chocolate bunnies, pastel candies, or even colorful jelly beans.
- Make It Gluten-Free: Swap the all-purpose flour for a gluten-free blend to make this recipe gluten-free.
Recipe Variations of Chocolate Easter Egg Nest Cake
Here are 5 variations you can try to customize your Easter cake:
- Carrot Cake Nest: Swap the chocolate sponge for a moist carrot cake and use cream cheese frosting for a tangy contrast to the sweetness of the Easter eggs.
- Peanut Butter Nest Cake: Add a swirl of peanut butter to the frosting or cake for a rich and nutty flavor.
- Mint Chocolate Nest Cake: Incorporate mint extract into the frosting and decorate with mint chocolate eggs for a refreshing twist.
- Lemon Easter Egg Cake: Add a lemon zest to the cake for a light, citrusy flavor that balances the richness of the chocolate.
- Coconut Cream Cake: Use coconut milk and coconut flakes in both the cake and frosting for a tropical-inspired twist on the traditional recipe.
Freezing and Storage for Chocolate Easter Egg Nest Cake
- Freezing: You can freeze the Chocolate Easter Egg Nest Cake for up to 3 months. Wrap it tightly in plastic wrap and store it in an airtight container before freezing. To serve, thaw the cake at room temperature.
- Storage: Store the cake in an airtight container at room temperature for up to 5 days. The frosting will keep it fresh and moist.
Special Equipment for Chocolate Easter Egg Nest Cake
Here’s a list of equipment you might need:
- 8-inch Round Cake Pans: Ideal for making two layers of cake.
- Electric Mixer: An electric mixer makes it easier to beat the butter and sugar into a creamy frosting.
- Measuring Cups and Spoons: Accurate measurements ensure the best results for the cake and frosting.
- Cooling Rack: To cool the cakes evenly before frosting.
- Spatula: For spreading the frosting smoothly and evenly.
- Piping Bag (optional): If you want to pipe frosting decorations.
FAQ Section for Chocolate Easter Egg Nest Cake
- Can I use store-bought frosting instead of homemade?
Yes, store-bought frosting can be used, though homemade frosting offers a richer flavor and smoother texture. - Can I use a different kind of candy?
Absolutely! You can use jelly beans, chocolate bunnies, or any other Easter-themed candy for decoration. - Can I make this cake in advance?
Yes, you can bake the cake a day or two ahead of time and frost it just before serving. - Is this recipe Halal?
Yes, this recipe is Halal and does not contain pork, bacon, or alcohol. - Can I make this cake gluten-free?
Yes, you can replace the all-purpose flour with a gluten-free flour blend.

Chocolate Easter Egg Nest Cake
- Total Time: 1hour 30minutes
Ingredients
For the Chocolate Sponge Cake:
-
1 ¾ cups all-purpose flour
-
1 cup unsweetened cocoa powder
-
1 ½ teaspoons baking powder
-
½ teaspoon baking soda
-
1 teaspoon salt
-
1 cup granulated sugar
-
1 cup brown sugar, packed
-
2 large eggs
-
1 cup buttermilk (or regular milk)
-
½ cup vegetable oil
-
1 teaspoon vanilla extract
-
1 cup boiling water
For the Chocolate Frosting:
-
1 cup unsalted butter, softened
-
2 cups powdered sugar
-
1 cup unsweetened cocoa powder
-
2 teaspoons vanilla extract
-
2–3 tablespoons milk (or as needed)
-
A pinch of salt
For the Nest Decoration:
-
1 cup shredded coconut (optional)
-
1 ½ cups mini chocolate eggs (such as Easter egg candies or chocolate-covered almonds)
-
Small chocolate shavings (optional, for extra texture)
Ingredient Highlights
-
Cocoa Powder: The unsweetened cocoa powder gives the cake its deep, rich chocolate flavor.
-
Buttermilk: Buttermilk adds moisture to the sponge and ensures a light, airy texture.
-
Shredded Coconut: Toasted shredded coconut can mimic the look of a nest, adding both texture and a touch of sweetness.
-
Mini Easter Eggs: The colorful chocolate eggs are the star of the decoration, bringing a fun and festive look to your dessert.
-
Butter: The creamy butter in the frosting helps to create a smooth and rich texture, making the frosting the perfect complement to the cake.
Instructions
Prepare the Chocolate Cake Batter for Chocolate Easter Egg Nest Cake:
-
Preheat the Oven: Preheat your oven to 350°F (175°C). Grease and flour two 8-inch round cake pans or line them with parchment paper to prevent sticking.
-
Combine the Dry Ingredients: In a large bowl, sift together the flour, cocoa powder, baking powder, baking soda, and salt. Set aside.
-
Mix the Wet Ingredients: In another large bowl, whisk together the granulated sugar, brown sugar, eggs, buttermilk, vegetable oil, and vanilla extract. Stir until well combined.
-
Add Dry Ingredients to Wet: Gradually add the dry ingredients to the wet mixture, mixing until just combined. Be careful not to overmix.
-
Add Boiling Water: Stir in the boiling water to the batter. This will thin the batter, making it more like a liquid than a traditional cake batter, but don’t worry—it’s the key to a moist cake.
Bake the Chocolate Sponge Cake:
-
Pour the Batter into Pans: Divide the batter evenly between the prepared cake pans.
-
Bake: Bake for 25-30 minutes, or until a toothpick inserted into the center of the cake comes out clean or with a few moist crumbs. The cakes should be springy to the touch.
-
Cool the Cakes: Allow the cakes to cool in the pans for about 10 minutes before transferring them to a wire rack to cool completely.
Prepare the Chocolate Frosting for Chocolate Easter Egg Nest Cake:
-
Make the Frosting: In a large mixing bowl, beat the softened butter until creamy. Gradually add the powdered sugar and cocoa powder, mixing until smooth.
-
Add Milk and Vanilla: Add 2 tablespoons of milk and the vanilla extract, and beat until the frosting reaches a spreadable consistency. If it’s too thick, add an extra tablespoon of milk; if it’s too thin, add a bit more powdered sugar.
-
Frost the Cake: Once the cakes have cooled, place the first cake layer on a serving plate. Spread a layer of frosting on top. Add the second layer of cake and cover the entire cake with the frosting, smoothing it out with a spatula.
Create the Nest Design for Chocolate Easter Egg Nest Cake:
-
Toast the Coconut: If using shredded coconut, place it in a dry skillet over medium heat and stir constantly until it’s lightly golden and fragrant. Set aside to cool.
-
Decorate the Cake: Carefully arrange the toasted coconut (or you can leave it plain) in a circular pattern on top of the cake to mimic the look of a nest.
-
Add the Mini Easter Eggs: Place the mini chocolate eggs in the center of the coconut “nest” or sprinkle them around the cake as desired.
-
Optional Decoration: You can add chocolate shavings around the cake’s edge or use extra frosting to pipe decorative designs.
Cut and Serve Chocolate Easter Egg Nest Cake:
-
Serve: Once the cake is decorated, it’s time to cut into it and enjoy. Serve the Chocolate Easter Egg Nest Cake chilled or at room temperature for a perfect Easter treat.
- Prep Time: 20minutes
Nutrition
- Serving Size: 16
- Calories: 400
- Fat: 20g
- Carbohydrates: 50g
- Protein: 4g
Conclusion for Chocolate Easter Egg Nest Cake
Chocolate Easter Egg Nest Cake is a show-stopping dessert that’s perfect for Easter and beyond. It’s a deliciously rich, moist cake that’s easy to make, and its festive, colorful nest design makes it the highlight of any celebration. Whether you’re serving it at an Easter brunch or gifting it to loved ones, this cake is guaranteed to be a hit. Enjoy the joy of baking and sharing this sweet, indulgent treat with friends and family this holiday season!