

Discover the Kitchen Tool Everyone Is Raving About!
- • Precision Engineered: Sharp blade with durable craftsmanship.
- • Comfort First: Ergonomic design for effortless slicing.
- • Stylish & Strong: Elegant wood handle meets stainless steel strength.
- • Risk-Free Pick: Thousands of happy home chefs can’t be wrong.
- • Today’s Deal: Just $29.95 instead of $99.85 — limited-time offer!
This post may include affiliate links — learn more here .
Introduction
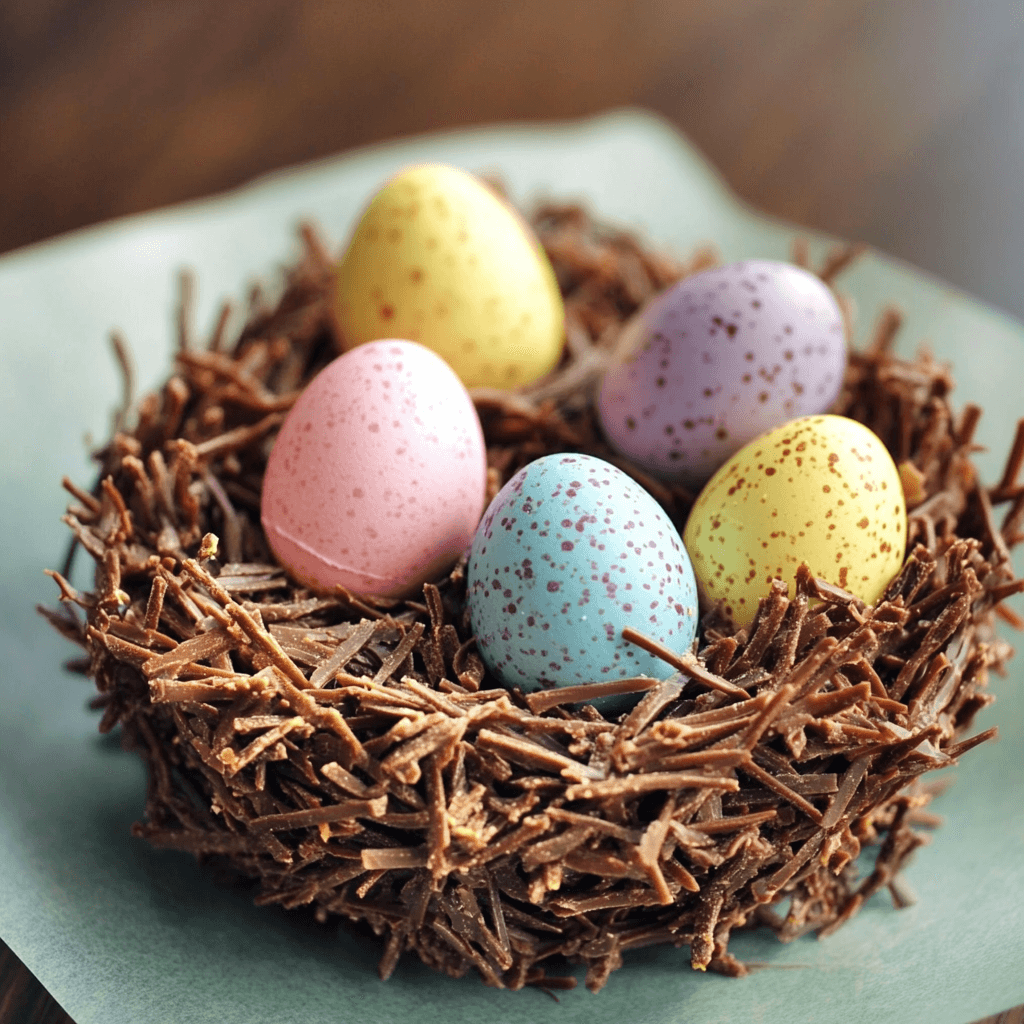
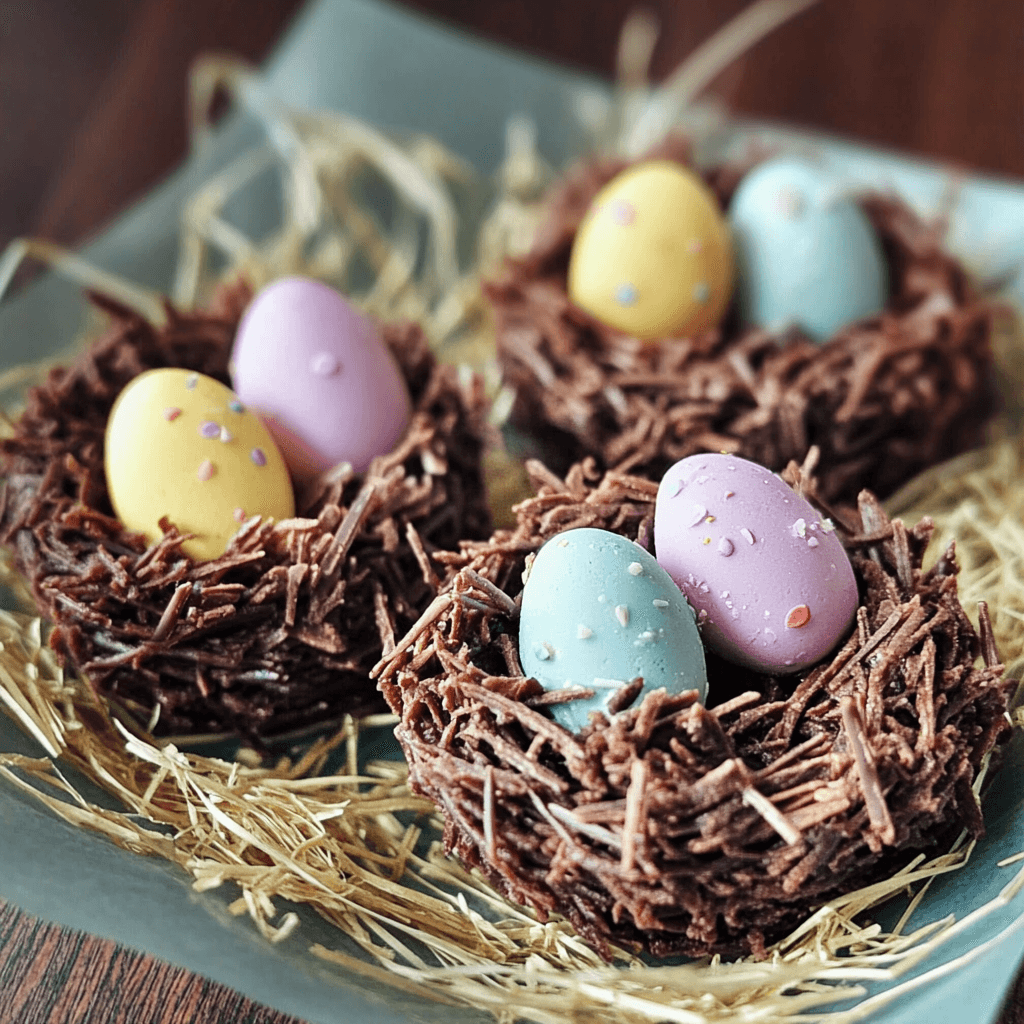
Chocolate Easter Egg Nest Treats are a delightful, fun, and festive dessert that combines the rich flavor of chocolate with the crunchy texture of a cereal nest. These no-bake treats are easy to make and perfect for celebrating Easter or any spring occasion. The chocolate coating, combined with crispy cereal, creates the base for a nest, which is then topped with colorful candy eggs, mimicking a bird’s nest. These treats are not only delicious but also customizable, making them a favorite among kids and adults alike.
Whether you’re looking for a quick, kid-friendly Easter activity or want to surprise your guests with a fun, sweet treat, Chocolate Easter Egg Nest Treats are the answer. With their rich chocolate flavor and festive look, they’re sure to add a little extra sweetness to your spring celebrations.
Perfect for:
- Easter celebrations
- Spring picnics
- Kid-friendly baking projects
- Gifts for friends and family
- Classroom or party treats
- Chocolate lovers
Why You’ll Love This Recipe: Chocolate Easter Egg Nest Treats
Here’s why Chocolate Easter Egg Nest Treats are a must-try this Easter:
- Simple to Make: With just a few ingredients, you can whip up these adorable nests in no time.
- No-Bake Convenience: No need to turn on the oven! These treats are made in a matter of minutes, making them perfect for quick prep.
- Fun for the Whole Family: Kids will love helping shape the nests and filling them with colorful candy eggs, making this an ideal family activity.
- Customizable: You can use different types of chocolate, cereals, and candy eggs to create a treat that suits your taste.
- Perfect for Gifting: These treats make great homemade gifts for Easter baskets, parties, or even as a thoughtful snack to share with loved ones.
Preparation and Cooking Time
- Total Time: 45 minutes
- Preparation Time: 15 minutes
- Chilling Time: 30 minutes
- Servings: 12-15 nests
- Calories per Serving: Approximately 180-220 calories per nest
- Key Nutrients: Protein: 2g, Carbs: 30g, Fat: 12g
Ingredients
Here’s what you’ll need to make Chocolate Easter Egg Nest Treats:
- 2 cups milk chocolate chips (or dark chocolate chips for a richer flavor)
- 1 cup peanut butter (creamy or chunky, your choice)
- 4 cups crispy rice cereal (or cornflakes, if you prefer)
- 1 teaspoon vanilla extract
- A pinch of salt (optional)
- 1 cup small candy-coated Easter eggs (or jelly beans, for a colorful look)
- 1/4 cup shredded coconut (optional, for extra texture)
- Mini marshmallows or chopped nuts (optional, for extra crunch)
Ingredient Highlights
- Milk Chocolate Chips: Chocolate is the star of this recipe, and using high-quality milk chocolate ensures a rich, creamy taste that pairs wonderfully with the crispy cereal.
- Peanut Butter: Peanut butter not only adds a nutty flavor but also helps bind the ingredients together, making the nests hold their shape while adding a delicious depth of flavor.
- Crispy Rice Cereal: This provides the crunchy texture that makes the nests so satisfying, and it soaks up the melted chocolate and peanut butter perfectly.
- Candy-Coated Eggs: These colorful eggs are the finishing touch, giving the nests a fun, Easter-like appearance. You can use any small candy eggs, from chocolate to candy-coated varieties.
- Shredded Coconut: This ingredient adds extra texture and a light, tropical flavor that enhances the nests’ overall taste, but it’s optional if you prefer a more straightforward chocolatey treat.
Step-by-Step

Follow these easy steps to create your perfect Chocolate Easter Egg Nest Treats:
Prepare the Chocolate Peanut Butter Mixture:
- Melt the Chocolate and Peanut Butter: In a medium saucepan over low heat, combine the chocolate chips and peanut butter. Stir occasionally until the chocolate and peanut butter are completely melted and smooth. Remove the saucepan from the heat and stir in the vanilla extract and a pinch of salt, if desired.
- Add the Cereal: Pour the crispy rice cereal into the melted chocolate mixture and gently stir with a spatula until the cereal is evenly coated. Be careful not to crush the cereal. If you like a more crunchy texture, you can also fold in the shredded coconut at this stage.
Form the Nests:
- Scoop the Mixture into Muffin Tins: Line a 12-cup muffin tin with paper liners or lightly grease the cups. Use a spoon or small ice cream scoop to portion the chocolate mixture into each cup, filling them about halfway.
- Shape the Nests: Using the back of a spoon, gently press down the center of each mound of chocolate mixture to form a nest shape. Be sure to leave a little room in the center for the candy eggs to sit later.
Chill and Set:
- Chill the Nests: Place the muffin tin in the refrigerator for at least 30 minutes to allow the chocolate to firm up and hold its shape.
Decorate and Serve:
- Add the Candy Eggs: Once the nests are firm, remove them from the fridge. Place 2-3 candy-coated Easter eggs (or jelly beans) in the center of each nest to complete the look. If you like, you can also sprinkle some mini marshmallows or chopped nuts on top for added texture and flavor.
- Serve: Your Chocolate Easter Egg Nest Treats are now ready to be enjoyed! Serve them at Easter brunch, pack them up for an Easter egg hunt, or simply enjoy them as a sweet treat throughout the spring.
How to Serve Chocolate Easter Egg Nest Treats
These Easter Egg Nest Treats are perfect for many occasions and can be served in various ways:
- As a Party Snack: Place them on a platter for your Easter brunch or spring gathering to impress guests with their festive and delicious look.
- As a Gift: Pack a few nests in a cute box or mason jar to gift to family or friends. They make a sweet and thoughtful homemade present for Easter.
- With Ice Cream: For an indulgent dessert, serve these nests alongside a scoop of vanilla or chocolate ice cream. You can even drizzle some caramel sauce on top for extra sweetness.
- On a Dessert Table: These nests can be part of a larger dessert spread at an Easter party, alongside cookies, cupcakes, or fruit tarts.
- As a Fun Activity: Let kids decorate their own nests with their choice of candy eggs, nuts, or marshmallows. This can be a fun Easter craft activity for children.
Additional Tips for Making Chocolate Easter Egg Nest Treats
To ensure your Chocolate Easter Egg Nest Treats turn out perfectly, here are some helpful tips:
- Use High-Quality Chocolate: For the best flavor, opt for good-quality chocolate chips or bars. You can even experiment with dark chocolate for a slightly more intense flavor.
- Customize Your Fillings: If you want to mix it up, try adding crushed pretzels for a salty crunch or dried fruit for a chewy contrast.
- Don’t Overfill: When adding the cereal, be careful not to overfill the muffin tins. Leave a little room at the top for shaping the nests.
- Chill for the Perfect Texture: Make sure to chill the nests long enough to allow the chocolate to set, so they hold their shape when you remove them from the muffin tin.
- Make a Double Batch: These treats are so popular that you may want to make a double batch to ensure there are enough to go around.
Recipe Variations of Chocolate Easter Egg Nest Treats
Here are a few creative variations you can try for your Easter Egg Nest Treats:
- Peanut Butter Easter Egg Nests: Use peanut butter chips instead of milk chocolate for a richer, peanutty flavor.
- Coconut Chocolate Easter Egg Nests: Add extra shredded coconut to both the chocolate mixture and the topping for an extra coconut flavor.
- Caramel Easter Egg Nests: Swirl in some caramel sauce with the melted chocolate for a rich, gooey flavor.
- Dark Chocolate Easter Egg Nests: For a more sophisticated flavor, use dark chocolate instead of milk chocolate.
- M&M Easter Egg Nests: Swap the candy-coated Easter eggs for colorful M&Ms for a bright, festive look.
- White Chocolate Easter Egg Nests: Use white chocolate chips for a lighter, creamier flavor that pairs well with pastel-colored candy eggs.
- Almond Joy Easter Egg Nests: Add whole almonds to the mixture for a crunchy, nutty twist, reminiscent of an Almond Joy candy bar.
- Mini Egg Nests: Instead of small candy-coated eggs, use mini chocolate eggs or malted milk balls for a different look and texture.
- Oreo Easter Egg Nests: Crush up some Oreos and stir them into the chocolate mixture for a cookies and cream twist.
- Chia Seed Easter Egg Nests: Add chia seeds to the chocolate mixture for a crunchy, healthy twist on the classic recipe.
Freezing and Storage for Chocolate Easter Egg Nest Treats
- Freezing: These treats can be frozen for up to 3 months. Simply place them in an airtight container or wrap them tightly in plastic wrap, then store them in the freezer. To serve, allow them to thaw at room temperature for about 15 minutes.
- Storage: Store the nests in an airtight container at room temperature for up to 5 days. They will stay fresh and delicious, perfect for snacking throughout the week.
Special Equipment for Chocolate Easter Egg Nest Treats
Here are a few special tools you might need for making Chocolate Easter Egg Nest Treats:
- Muffin Tin: A muffin tin helps shape the nests perfectly and ensures even portions.
- Spatula or Wooden Spoon: A spatula or wooden spoon will help you gently mix the chocolate and cereal without crushing the cereal.
- Ice Cream Scoop: An ice cream scoop helps portion the chocolate mixture evenly into the muffin tin.
- Wax Paper or Parchment Paper: Lining the muffin tin with wax paper makes it easier to remove the nests once they have set.
- Airtight Container: For storing the nests, an airtight container will keep them fresh for several days.
FAQ Section about Chocolate Easter Egg Nest Treats
- Can I use a different type of cereal?
Yes, you can use cornflakes or any other crispy cereal you like. The texture will vary, but the treats will still be delicious. - Can I make these treats without peanut butter?
Yes, if you’re allergic to peanuts or prefer not to use peanut butter, you can substitute it with almond butter or sunflower seed butter for a similar binding effect. - How do I store these treats?
Store your nests in an airtight container at room temperature for up to 5 days or freeze them for up to 3 months. - Can I use other types of chocolate?
Absolutely! You can use dark, milk, or white chocolate depending on your preference. Each will give a slightly different flavor to the nests. - How do I know when the nests are ready?
Once the nests are chilled for about 30 minutes, they should hold their shape and be firm to the touch. Make sure they’ve had enough time in the fridge to set properly.

Chocolate Easter Egg Nest Treats
- Total Time: 45minutes
Ingredients
- 2 cups milk chocolate chips (or dark chocolate chips for a richer flavor)
- 1 cup peanut butter (creamy or chunky, your choice)
- 4 cups crispy rice cereal (or cornflakes, if you prefer)
- 1 teaspoon vanilla extract
- A pinch of salt (optional)
- 1 cup small candy-coated Easter eggs (or jelly beans, for a colorful look)
- 1/4 cup shredded coconut (optional, for extra texture)
- Mini marshmallows or chopped nuts (optional, for extra crunch)
Ingredient Highlights
- Milk Chocolate Chips: Chocolate is the star of this recipe, and using high-quality milk chocolate ensures a rich, creamy taste that pairs wonderfully with the crispy cereal.
- Peanut Butter: Peanut butter not only adds a nutty flavor but also helps bind the ingredients together, making the nests hold their shape while adding a delicious depth of flavor.
- Crispy Rice Cereal: This provides the crunchy texture that makes the nests so satisfying, and it soaks up the melted chocolate and peanut butter perfectly.
- Candy-Coated Eggs: These colorful eggs are the finishing touch, giving the nests a fun, Easter-like appearance. You can use any small candy eggs, from chocolate to candy-coated varieties.
- Shredded Coconut: This ingredient adds extra texture and a light, tropical flavor that enhances the nests’ overall taste, but it’s optional if you prefer a more straightforward chocolatey treat.
Instructions
Prepare the Chocolate Peanut Butter Mixture:
-
Melt the Chocolate and Peanut Butter: In a medium saucepan over low heat, combine the chocolate chips and peanut butter. Stir occasionally until the chocolate and peanut butter are completely melted and smooth. Remove the saucepan from the heat and stir in the vanilla extract and a pinch of salt, if desired.
-
Add the Cereal: Pour the crispy rice cereal into the melted chocolate mixture and gently stir with a spatula until the cereal is evenly coated. Be careful not to crush the cereal. If you like a more crunchy texture, you can also fold in the shredded coconut at this stage.
Form the Nests:
-
Scoop the Mixture into Muffin Tins: Line a 12-cup muffin tin with paper liners or lightly grease the cups. Use a spoon or small ice cream scoop to portion the chocolate mixture into each cup, filling them about halfway.
-
Shape the Nests: Using the back of a spoon, gently press down the center of each mound of chocolate mixture to form a nest shape. Be sure to leave a little room in the center for the candy eggs to sit later.
Chill and Set:
- Chill the Nests: Place the muffin tin in the refrigerator for at least 30 minutes to allow the chocolate to firm up and hold its shape.
Decorate and Serve:
-
Add the Candy Eggs: Once the nests are firm, remove them from the fridge. Place 2-3 candy-coated Easter eggs (or jelly beans) in the center of each nest to complete the look. If you like, you can also sprinkle some mini marshmallows or chopped nuts on top for added texture and flavor.
-
Serve: Your Chocolate Easter Egg Nest Treats are now ready to be enjoyed! Serve them at Easter brunch, pack them up for an Easter egg hunt, or simply enjoy them as a sweet treat throughout the spring.
- Prep Time: 15minutes
Nutrition
- Serving Size: 15
- Calories: 220
- Fat: 12g
- Carbohydrates: 30g
- Protein: 2g
Conclusion of Chocolate Easter Egg Nest Treats
Chocolate Easter Egg Nest Treats are the perfect combination of chocolate, crunch, and sweetness for any Easter celebration. Whether you’re making them for a party, family gathering, or as a fun activity with kids, these no-bake treats are sure to bring joy to everyone. With their easy preparation, customizable ingredients, and festive look, these nests are an excellent choice for springtime desserts. Enjoy the deliciously sweet and crunchy nests, and let them bring a smile to your face this Easter season!