


Discover the Kitchen Tool Everyone Is Raving About!
- • Precision Engineered: Sharp blade with durable craftsmanship.
- • Comfort First: Ergonomic design for effortless slicing.
- • Stylish & Strong: Elegant wood handle meets stainless steel strength.
- • Risk-Free Pick: Thousands of happy home chefs can’t be wrong.
- • Today’s Deal: Just $29.95 instead of $99.85 — limited-time offer!
This post may include affiliate links — learn more here .
Introduction
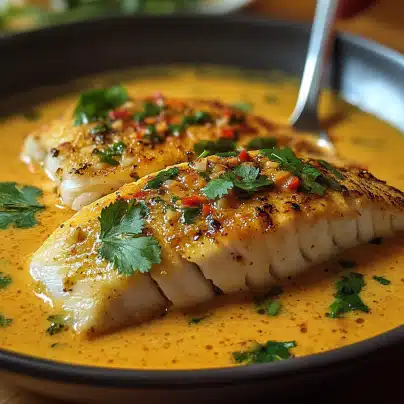
If you love the rich flavors of curry and the light, flaky texture of fish, then Coconut Curry Baked Cod is a dish you absolutely must try. This recipe combines tender cod fillets with a creamy, aromatic coconut curry sauce that is both satisfying and full of flavor. It’s a perfect meal for those who want something healthy, yet indulgent, with a perfect balance of spices and creamy goodness. The coconut milk provides a silky smooth base for the curry, while the baked cod absorbs all the wonderful flavors, making every bite a delightful experience.
In this article, we’ll delve into why Coconut Curry Baked Cod is a must-try, provide you with step-by-step instructions on how to make it, and share helpful tips and variations to personalize this dish to suit your taste. Whether you’re a fan of seafood or just looking for a quick and flavorful dinner option, this dish is sure to become a favorite in your culinary repertoire.
Why You’ll Love This Recipe
- Flavorful and Aromatic: The combination of curry spices, coconut milk, and fresh ingredients creates a sauce that is full of depth and warmth, making this dish flavorful and comforting.
- Healthy and Light: Cod is a lean, low-fat fish, making it a healthy option for a protein-packed meal. The use of coconut milk, although creamy, offers a lighter alternative to heavy creams, giving the dish richness without being overly indulgent.
- Quick and Easy: With minimal prep time and simple ingredients, this recipe comes together in less than 45 minutes, making it perfect for busy weeknights or casual gatherings.
- Halal-Friendly: This recipe contains no pork, bacon, or wine, making it suitable for those following halal dietary restrictions.
- Customizable: You can adjust the spice level, add extra vegetables, or experiment with different types of fish to make this dish your own.
Preparation Time and Servings
- Total Time: 40 minutes (15 minutes for prep, 25 minutes for baking)
- Servings: This recipe serves 4 people.
- Nutrition Facts (per serving): Calories: 280, Protein: 25g, Carbs: 10g, Fat: 18g.
Ingredients
For the Coconut Curry Sauce:
- 1 tablespoon olive oil: For sautéing the aromatics and providing a base for the curry sauce.
- 1 small onion: Finely chopped, for sweetness and depth of flavor.
- 2 garlic cloves: Minced, to add a savory note to the curry sauce.
- 1-inch piece of ginger: Grated, for a fresh, zesty kick that pairs perfectly with the coconut and curry.
- 2 tablespoons curry powder: For the signature warm, earthy flavor that defines this dish.
- 1 teaspoon ground turmeric: For color and a subtle earthy bitterness.
- 1 teaspoon ground cumin: To complement the curry spices and add complexity.
- 1 can (14 oz) coconut milk: The base of the sauce, providing a creamy, rich texture.
- ½ cup chicken broth: To thin the sauce slightly while adding a savory depth.
- 1 tablespoon lime juice: For a hint of acidity to balance the richness of the coconut milk.
- Salt and pepper: To taste.
For the Cod:
- 4 cod fillets (about 6 oz each): Fresh or thawed if frozen, cod is a mild, flaky fish that absorbs the curry sauce beautifully.
- 1 tablespoon olive oil: For drizzling on the cod to ensure it bakes up moist and tender.
- Salt and pepper: To season the fish before baking.
Optional Garnish:
- Fresh cilantro: Chopped, for a burst of freshness and color.
- Lime wedges: For squeezing over the dish just before serving.
- Chili flakes: For a little extra heat, if desired.
Step-by-Step
 Preparation
FIRST STEP: PREPARE THE COCONUT CURRY SAUCE
- Sauté the Aromatics: In a large skillet or saucepan, heat the olive oil over medium heat. Add the chopped onion and sauté for 3-4 minutes until softened and translucent.
- Add Garlic and Ginger: Add the minced garlic and grated ginger to the onions. Cook for another 1-2 minutes, stirring frequently, until fragrant.
- Add the Spices: Sprinkle in the curry powder, turmeric, and cumin. Stir to coat the onions, garlic, and ginger with the spices, letting them toast slightly for about 1 minute. This step helps release the full flavors of the spices.
- Add the Coconut Milk and Broth: Pour in the coconut milk and chicken broth, stirring to combine. Bring the sauce to a simmer, then lower the heat and let it cook for 5-7 minutes, allowing the flavors to meld together.
- Season the Sauce: Add lime juice, and season with salt and pepper to taste. Adjust the seasoning if needed, ensuring a perfect balance of salty, sweet, and tangy.
SECOND STEP: PREPARE THE COD FILLETS
- Preheat the Oven: Preheat your oven to 375°F (190°C). Line a baking dish with parchment paper or lightly grease it with olive oil.
- Season the Cod: Pat the cod fillets dry with a paper towel. Drizzle them with olive oil, then season generously with salt and pepper on both sides. If you prefer a more intense flavor, you can even rub the fillets with a little bit of the curry spice mix, but this step is optional.
- Place the Cod in the Baking Dish: Arrange the seasoned cod fillets in a single layer in the prepared baking dish.
THIRD STEP: BAKE THE COD WITH COCONUT CURRY SAUCE
- Pour the Sauce Over the Cod: Once the curry sauce has simmered and thickened, pour it over the cod fillets, ensuring that each piece is covered in the fragrant coconut curry sauce.
- Bake the Cod: Place the baking dish in the preheated oven and bake for 20-25 minutes, or until the cod is fully cooked through and flakes easily with a fork. The fish should be tender, and the sauce should be bubbling.
- Optional: For a golden, slightly crispy top, you can broil the cod for the last 2-3 minutes of baking. Just keep an eye on it to avoid burning the sauce.
FINAL STEP: GARNISH AND SERVE
- Garnish: Once the cod is cooked, remove the baking dish from the oven. Garnish the dish with freshly chopped cilantro and a squeeze of lime juice. For extra heat, sprinkle chili flakes over the top.
- Serve: Serve the Coconut Curry Baked Cod with your favorite side dishes. This dish pairs beautifully with steamed jasmine rice, quinoa, or sautéed vegetables. You can also serve it with a side of naan or flatbread to soak up the flavorful curry sauce
How to Serve Coconut Curry Baked Cod
Coconut Curry Baked Cod is a versatile dish that works well in many different contexts. Here are some great ideas for serving this flavorful dish:
1. As a Weeknight Dinner
This dish is perfect for a quick and easy weeknight dinner. The preparation time is minimal, and the dish comes together quickly, making it ideal for busy evenings. Pair it with a light salad or some roasted vegetables for a well-rounded meal.
2. With Rice or Quinoa
Coconut curry pairs wonderfully with rice or quinoa, as the grains soak up the rich, aromatic sauce. A simple steamed jasmine rice or a herbed quinoa would complement the flavors perfectly, creating a balanced and filling meal.
3. As Part of a Seafood Feast
If you’re hosting a seafood-focused meal, Coconut Curry Baked Cod makes an excellent main dish. Serve it alongside other seafood dishes like garlic shrimp, seared scallops, or a fresh seafood salad for a diverse and delicious spread.
4. As a Healthy Lunch Option
The light and healthy nature of this dish makes it a great option for lunch. Serve it with a side of greens or a cucumber salad for a refreshing and satisfying midday meal.
Additional Tips
- Use Different Fish: While cod is a great choice for this recipe, you can also use other white fish like tilapia, halibut, or snapper. Just be sure to adjust the cooking time based on the thickness of the fillets.
- Adjust the Spice Level: If you prefer a milder curry, reduce the amount of curry powder or omit the chili flakes. For extra heat, add some chopped fresh chili or cayenne pepper to the sauce.
- Add Vegetables: Feel free to add vegetables like bell peppers, spinach, or peas to the curry sauce. They’ll absorb the flavors and add texture to the dish.
- Make it Dairy-Free: The recipe is already dairy-free thanks to the coconut milk, making it suitable for those with lactose intolerance or following a dairy-free diet.
- Prepare the Sauce in Advance: The coconut curry sauce can be made ahead of time and stored in the refrigerator for up to 2 days. Just reheat it before pouring it over the cod for a quick and easy meal.
Recipe Variations
While Coconut Curry Baked Cod is delicious as written, there are many ways to make it your own. Here are some fun variations:
1. Add Coconut Flakes
For extra texture and a boost of coconut flavor, try sprinkling toasted coconut flakes over the top of the fish before serving. It will add a crunchy contrast to the creamy sauce.
2. Make it Spicy
If you love spice, increase the amount of curry powder, add chopped fresh chilies, or incorporate a dash of hot sauce into the coconut curry sauce.
3. Use Fresh Tomatoes
For a fresh, slightly tangy note, add chopped tomatoes to the curry sauce. Let them cook down with the sauce for an extra burst of flavor.
Freezing and Storage
This dish is best served fresh, but if you have leftovers, here’s how to store them:
- Refrigeration: Store the baked cod and curry sauce in an airtight container in the refrigerator for up to 2 days. Reheat gently on the stove or in the microwave.
- Freezing: You can freeze the cooked cod and curry sauce for up to 1 month. To reheat, defrost in the refrigerator overnight and warm up in a saucepan over low heat.
Special Equipment
- Baking Dish: A 9×13-inch baking dish works well for this recipe, providing enough space for the cod fillets and sauce.
- Skillet or Saucepan: Use a medium-sized skillet or saucepan to make the curry sauce.
Frequently Asked Questions
- Can I use another type of fish? Yes, you can substitute cod with other firm white fish like tilapia, halibut, or snapper.
- Is this recipe gluten-free? Yes! This recipe is naturally gluten-free, as it contains no wheat-based ingredients.
- Can I use low-fat coconut milk? Yes, you can use light coconut milk if you want to reduce the fat content, though the sauce may be slightly less rich.
- Can I make this dish ahead of time? While it’s best served fresh, you can prepare the coconut curry sauce in advance and store it in the refrigerator for up to 2 days. When ready, bake the fish and pour the sauce over it just before serving.
- Can I add more vegetables? Absolutely! Adding vegetables like bell peppers, zucchini, or spinach to the curry sauce will enhance the flavor and texture of the dish.

Coconut Curry Baked Cod
- Total Time: 30 minutes
Ingredients
For the Shrimp Marinade:
- 1 lb large shrimp: Peeled and deveined. Shrimp are quick to cook and soak up flavors well.
- 2 tablespoons olive oil: Used to coat the shrimp and keep them moist during cooking.
- 1 tablespoon lime juice: Adds a zesty kick to the shrimp marinade.
- 2 tablespoons fresh cilantro: Chopped, for a burst of fresh, aromatic flavor.
- 1 clove garlic: Minced, to enhance the flavor of the shrimp.
- ½ teaspoon ground cumin: Adds warmth and depth to the marinade.
- 1 teaspoon chili powder: For a touch of heat and smokiness.
- Salt and pepper: To taste, for seasoning the shrimp.
For the Creamy Slaw:
- 2 cups shredded cabbage: A mix of red and green cabbage works well, offering a colorful base for the slaw.
- ½ cup shredded carrots: Adds a bit of sweetness and color to the slaw.
- ¼ cup chopped cilantro: Fresh cilantro adds brightness and enhances the flavor of the slaw.
- ¾ cup plain Greek yogurt: Adds a creamy texture to the slaw without being too heavy.
- 2 tablespoons mayonnaise: For extra creaminess.
- 1 tablespoon lime juice: To balance the creaminess with some acidity.
- 1 teaspoon honey: A touch of sweetness to round out the tangy flavors.
- Salt and pepper: To taste, to season the slaw.
For the Tacos:
- 8 small corn tortillas: Soft corn tortillas are perfect for these tacos, providing a mild and neutral base to showcase the shrimp and slaw.
- Lime wedges: For serving, to squeeze fresh lime juice on top of the tacos before eating.
- Fresh cilantro leaves: For garnish, adding a pop of color and flavor.
- Optional toppings: Sliced avocado, salsa, or hot sauce for extra flavor.
Instructions
FIRST STEP: MARINATE THE SHRIMP
- Prepare the Shrimp: Start by peeling and deveining the shrimp if they aren’t already prepared. Pat them dry with paper towels to remove any excess moisture.
- Make the Marinade: In a small bowl, combine the olive oil, lime juice, chopped cilantro, minced garlic, cumin, chili powder, salt, and pepper. Stir the mixture until well combined.
- Marinate the Shrimp: Place the shrimp in a large bowl or resealable plastic bag and pour the marinade over them. Toss the shrimp until they’re evenly coated with the marinade. Cover the bowl or seal the bag and refrigerate for at least 15 minutes to allow the flavors to meld. If you have more time, marinate for up to 1 hour for even more flavor.
SECOND STEP: PREPARE THE CREAMY SLAW
- Mix the Slaw Base: In a large bowl, combine the shredded cabbage, shredded carrots, and chopped cilantro.
- Prepare the Dressing: In a separate smaller bowl, whisk together the Greek yogurt, mayonnaise, lime juice, and honey. Season with salt and pepper to taste.
- Toss the Slaw: Pour the creamy dressing over the shredded vegetables and toss everything together until evenly coated. Adjust seasoning as needed, adding more salt, pepper, or honey depending on your taste preferences.
- Chill the Slaw: For the best flavor, let the slaw chill in the refrigerator while you cook the shrimp. This allows the flavors to combine and the slaw to firm up.
THIRD STEP: COOK THE SHRIMP
- Heat the Pan: Heat a large skillet over medium-high heat. Add a drizzle of olive oil to the pan.
- Cook the Shrimp: Once the oil is hot, add the marinated shrimp to the pan in a single layer. Cook for about 2-3 minutes on each side, or until the shrimp turn pink and opaque. Be careful not to overcook the shrimp, as they cook quickly.
- Remove and Set Aside: Once the shrimp are cooked, remove them from the pan and set them aside.
FOURTH STEP: WARM THE TORTILLAS
- Heat the Tortillas: Place the corn tortillas in a dry skillet over medium heat for about 30 seconds on each side, or until they’re warm and slightly toasted. Alternatively, you can wrap them in a damp paper towel and microwave them for about 20 seconds.
- Assemble the Tacos: To assemble the tacos, place two warm tortillas on each plate. Add a few shrimp to the center of each tortilla.
- Top with Slaw: Spoon the creamy slaw generously over the shrimp.
- Garnish and Serve: Garnish with fresh cilantro leaves, a squeeze of lime juice, and any optional toppings you prefer, such as sliced avocado or salsa.
FINAL STEP: ENJOY!
Serve the Cilantro Lime Shrimp Tacos immediately, with lime wedges on the side for extra flavor. Enjoy these refreshing, zesty tacos as a light, satisfying meal.
Nutrition
- Serving Size: 4
- Calories: 350
- Fat: 15g
- Carbohydrates: 35g
- Protein: 25g
Conclusion
Coconut Curry Baked Cod is a simple yet flavorful dish that brings together the lightness of cod with the rich, aromatic flavors of coconut curry. It’s a healthy, Halal-friendly recipe that’s perfect for any occasion. Whether you’re cooking for a busy weeknight dinner or preparing a special meal for family and friends, this dish is sure to impress with its depth of flavor and creamy texture. Try it today and enjoy the perfect fusion of curry, coconut, and flaky fish in every bite.