

Discover the Kitchen Tool Everyone Is Raving About!
- • Precision Engineered: Sharp blade with durable craftsmanship.
- • Comfort First: Ergonomic design for effortless slicing.
- • Stylish & Strong: Elegant wood handle meets stainless steel strength.
- • Risk-Free Pick: Thousands of happy home chefs can’t be wrong.
- • Today’s Deal: Just $29.95 instead of $99.85 — limited-time offer!
This post may include affiliate links — learn more here .
Introduction
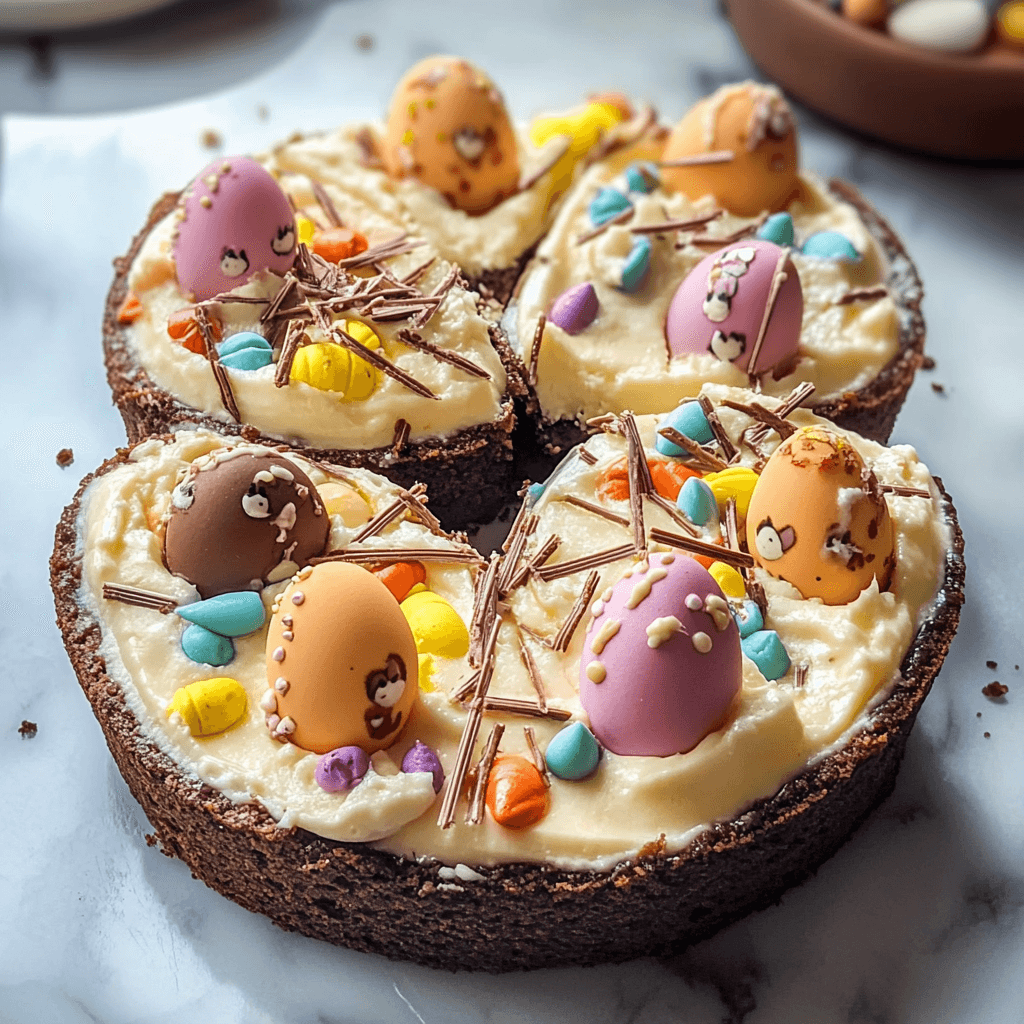
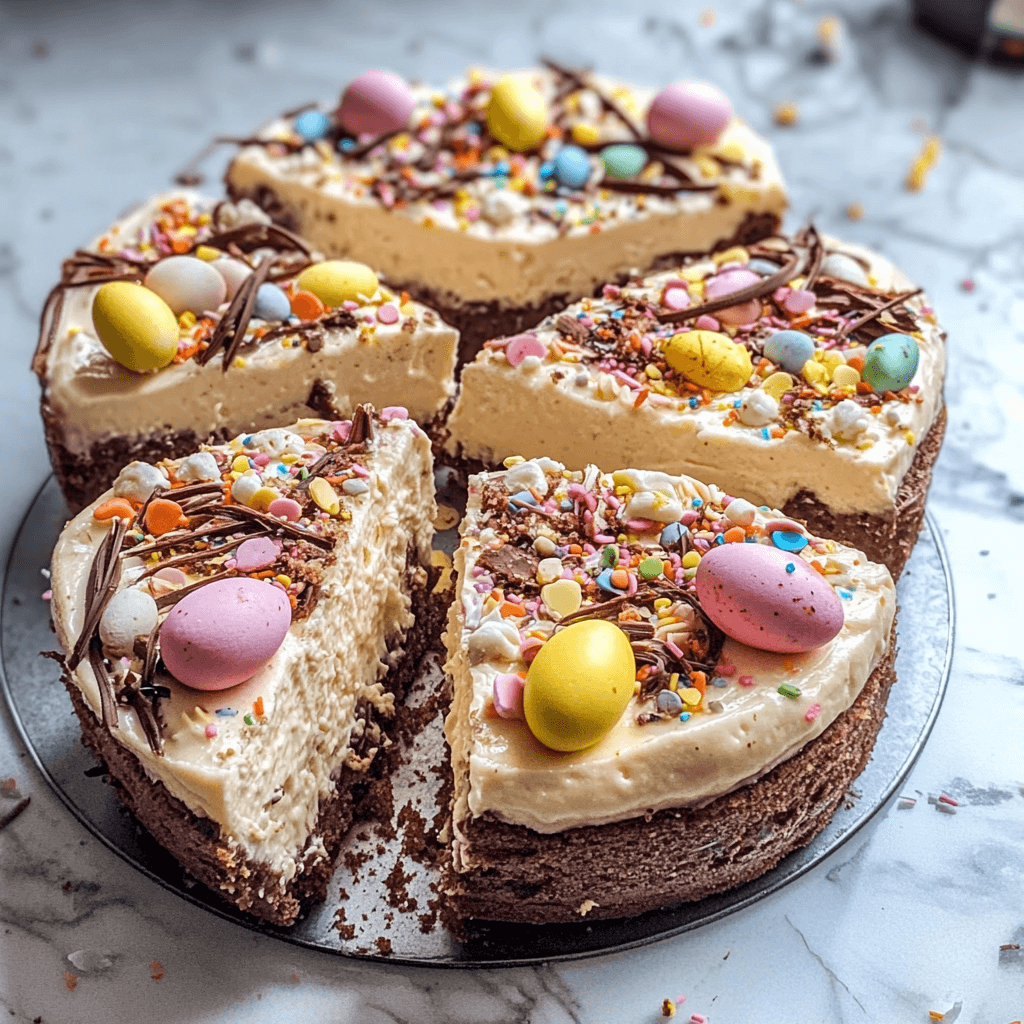
Easter Egg Cheesecake is a delightful and festive dessert that captures the spirit of Easter in every bite. This cheesecake is creamy, rich, and velvety with a fun and vibrant twist from colorful Easter eggs, making it an eye-catching centerpiece for any holiday table. With its smooth, sweet, and tangy flavor, paired with a crunchy crust, this cheesecake will undoubtedly become a favorite for your family and friends. Whether you’re celebrating Easter or simply looking for a delicious, special treat, Easter Egg Cheesecake offers a festive, delicious way to indulge. Easy to make and filled with a sweet surprise, it’s perfect for creating memorable moments during this joyful holiday.
Perfect for:
- Easter celebrations
- Holiday dinners and gatherings
- Special occasions or birthdays
- Sweet-tooth cravings
- A fun twist on a classic cheesecake
Why You’ll Love This Easter Egg Cheesecake Recipe
Here’s why Easter Egg Cheesecake will quickly become your go-to dessert this season:
- Rich and Creamy Flavor: This cheesecake is made with a luxurious cream cheese base that’s both smooth and tangy, making it the perfect balance to the sweetness of Easter eggs.
- Fun and Festive: The vibrant, colorful Easter eggs embedded in the cheesecake add a playful touch that kids and adults alike will love. It’s a fun way to celebrate the season.
- Simple to Make: With just a few simple ingredients and a few easy steps, you’ll have a show-stopping dessert ready for Easter or any gathering.
- Perfect for Sharing: This cheesecake is ideal for family dinners, parties, or as a sweet treat for Easter brunch. It serves many, so it’s perfect for sharing.
- Halal-Friendly: This recipe is completely halal, with no pork, bacon, wine, or alcohol involved, making it suitable for everyone to enjoy.
Preparation and Cooking Time
- Total Time: 6 hours (including chilling time)
- Preparation Time: 30 minutes
- Baking Time: 1 hour
- Chilling Time: 4 hours or overnight
- Servings: 10-12 slices
- Calories per serving: Approximately 350-400 calories
- Key Nutrients: Protein: 6g, Carbs: 35g, Fat: 24g
Ingredients
Here’s everything you’ll need to make this festive Easter Egg Cheesecake:
Crust:
- 1 ½ cups digestive biscuits or graham cracker crumbs (halal-certified)
- 1/3 cup unsalted butter, melted
- 1/4 cup granulated sugar
- A pinch of salt
Cheesecake Filling:
- 3 cups cream cheese (room temperature)
- 1 cup sour cream
- 1 cup powdered sugar
- 2 teaspoons vanilla extract
- 3 large eggs (room temperature)
- 2 tablespoons all-purpose flour
- 1/4 cup heavy cream
- 1 ½ cups colorful Easter eggs (halal chocolate eggs, or candy-coated chocolate eggs)
Topping:
- Whipped cream (optional)
- Extra crushed Easter eggs for garnish (optional)
- Fresh mint leaves for decoration (optional)
Ingredient Highlights:
- Digestive Biscuits/Graham Crackers: These provide the perfect base for the cheesecake with a buttery and crunchy texture. If you’re looking for a gluten-free alternative, use gluten-free crackers or biscuits.
- Cream Cheese: The main ingredient for the cheesecake filling, cream cheese gives the dessert its rich and tangy flavor and smooth texture.
- Sour Cream: Sour cream adds extra creaminess and a slight tanginess that helps balance the sweetness of the dessert.
- Easter Eggs: The colorful Easter eggs are the star of the show, adding both visual appeal and a delightful surprise in every bite. You can choose halal-certified chocolate eggs or candy-coated chocolate eggs.
- Vanilla Extract: This natural flavoring enhances the overall taste of the cheesecake, making it even more irresistible.
Step-by-Step

Follow these easy steps to make your Easter Egg Cheesecake:
Prepare the Crust:
- Preheat the Oven: Preheat your oven to 325°F (160°C). Line a 9-inch springform pan with parchment paper or grease it lightly to prevent the crust from sticking.
- Prepare the Crust: In a medium-sized bowl, mix together the crushed digestive biscuits or graham crackers, melted butter, granulated sugar, and a pinch of salt. Stir until the mixture is well combined.
- Press the Crust: Pour the mixture into the prepared springform pan and press it down evenly to form a compact crust. Use the back of a spoon to press it firmly into the bottom.
- Bake the Crust: Place the pan in the preheated oven and bake for 10 minutes, until the crust is lightly golden. Remove from the oven and set it aside to cool while you prepare the filling.
Make the Cheesecake Filling:
- Beat the Cream Cheese: In a large bowl, beat the cream cheese with an electric mixer until it’s smooth and creamy. This will take about 2-3 minutes. Make sure the cream cheese is at room temperature to avoid lumps.
- Add the Sugar and Sour Cream: Add the powdered sugar and sour cream to the cream cheese and continue mixing until everything is smooth and well combined.
- Add Eggs One at a Time: Beat in the eggs one at a time, making sure each egg is fully incorporated before adding the next. Scrape down the sides of the bowl as needed.
- Mix in the Vanilla and Flour: Add the vanilla extract and flour to the mixture, stirring gently to combine.
- Add the Heavy Cream: Pour in the heavy cream and mix until the filling is smooth and thick.
Assemble the Cheesecake:
- Pour the Filling into the Crust: Pour the cheesecake filling into the cooled crust, smoothing the top with a spatula. Gently tap the pan on the counter to release any air bubbles.
- Add the Easter Eggs: Gently press the colorful Easter eggs into the top of the cheesecake filling. You can arrange them in a decorative pattern, such as a ring around the edge or a cluster in the center.
- Bake the Cheesecake: Bake the cheesecake at 325°F (160°C) for 55-60 minutes. The center should be set but slightly jiggly when you tap the pan. Don’t worry if it cracks slightly; this is normal for cheesecakes.
- Cool the Cheesecake: Once baked, turn off the oven and leave the cheesecake in the oven with the door slightly ajar for about an hour. This will help prevent cracking. After an hour, remove the cheesecake from the oven and let it cool completely at room temperature.
- Chill the Cheesecake: Once the cheesecake has cooled to room temperature, cover it with plastic wrap and refrigerate for at least 4 hours or overnight to allow it to fully set.
Serve the Cheesecake:
- Garnish and Serve: Before serving, top the cheesecake with a dollop of whipped cream, extra crushed Easter eggs, and a few fresh mint leaves for a decorative touch. Slice the cheesecake and enjoy the festive treat!
How to Serve Easter Egg Cheesecake
Easter Egg Cheesecake is a versatile dessert that can be served in various ways to enhance its flavors and presentation:
- As a Standalone Dessert: The cheesecake is perfect as-is, with its smooth, creamy texture and colorful Easter egg topping providing all the indulgence you need.
- With a Cup of Tea or Coffee: Enjoy a slice with a warm cup of tea or coffee for a relaxing afternoon treat.
- For Special Occasions: Serve this cheesecake during Easter celebrations, family gatherings, or holiday dinners to impress your guests with its festive and delicious nature.
- With Fresh Fruit: Add a touch of freshness by serving with fresh berries such as strawberries, raspberries, or blueberries, which contrast nicely with the rich and sweet cheesecake.
- As Part of a Dessert Platter: If you’re serving other desserts at a party or gathering, slice this cheesecake into smaller pieces and place it on a dessert platter alongside cookies, brownies, and other treats.
Additional Tips for Easter Egg Cheesecake
Here are a few tips to ensure your Easter Egg Cheesecake turns out perfectly:
- Use Room Temperature Ingredients: Be sure that the cream cheese and eggs are at room temperature to avoid lumps in the filling and to achieve a smooth, creamy texture.
- Don’t Overmix the Filling: Overmixing can cause cracks to form during baking. Mix just until the ingredients are combined for a smooth and creamy consistency.
- Prevent Cracking: To reduce the chance of cracking, make sure your oven is not too hot when baking the cheesecake. You can also bake it in a water bath (placing the pan in a larger pan filled with hot water) to create a more even temperature.
- Chill for Best Results: Let the cheesecake chill for several hours or overnight for the best texture. This allows the flavors to develop fully and ensures that the cheesecake sets properly.
- Decorate with Seasonal Touches: If you want to add even more festive flair, decorate the cheesecake with Easter-themed decorations such as mini chocolate bunnies, edible flowers, or colorful sprinkles.
Recipe Variations for Easter Egg Cheesecake
If you want to try different variations of this Easter Egg Cheesecake, here are some fun ideas:
- Caramel Easter Egg Cheesecake: Add a drizzle of caramel sauce on top for a sweet, rich contrast to the tangy cheesecake.
- Fruit-Inspired Cheesecake: Swirl in some fruit preserves or fresh fruit, such as raspberry or strawberry, into the cheesecake filling before baking for a fruity twist.
- Chocolate Easter Egg Cheesecake: Use chocolate Easter eggs instead of colorful ones to create a rich, chocolaty version of the cheesecake.
- Mini Easter Egg Cheesecakes: Instead of making a large cheesecake, divide the filling into individual cupcake liners or mini springform pans for single-serving portions.
- Lemon and Easter Egg Cheesecake: Add a tablespoon of lemon zest and a teaspoon of lemon juice to the filling for a refreshing citrus flavor that pairs beautifully with the sweetness of the Easter eggs.
Freezing and Storage for Easter Egg Cheesecake
- Freezing: You can freeze this cheesecake for up to 3 months. Wrap it tightly in plastic wrap and then in aluminum foil before freezing. Thaw it in the refrigerator overnight before serving.
- Storage: Store the cheesecake in an airtight container in the fridge for up to 5 days. If you have leftover slices, be sure to refrigerate them to keep the texture and flavor fresh.
Special Equipment for Easter Egg Cheesecake
Here are some tools that will make preparing this cheesecake even easier:
- 9-Inch Springform Pan: A springform pan is perfect for cheesecakes as it allows easy removal from the pan without damaging the sides.
- Electric Mixer: An electric mixer will help beat the cream cheese smoothly and incorporate the eggs without overmixing.
- Spatula: A spatula is ideal for scraping down the sides of the bowl and smoothing the top of the cheesecake.
- Cooling Rack: Allow the cheesecake to cool on a wire rack after baking to ensure it cools evenly without becoming soggy.
- Whisk: A whisk is helpful when combining the wet ingredients and making sure everything is well-mixed.
FAQ Section for Easter Egg Cheesecake
- Can I use regular chocolate eggs instead of candy-coated ones? Yes, you can use any type of chocolate Easter eggs as long as they are halal-certified.
- Can I make this cheesecake dairy-free? Yes, substitute the cream cheese and sour cream with dairy-free alternatives and use dairy-free chocolate eggs.
- How do I prevent cracks in the cheesecake? To reduce cracking, bake the cheesecake at a lower temperature and avoid overmixing the batter. A water bath also helps maintain a moist, even heat.
- Can I make this cheesecake without a springform pan? Yes, you can use any other pan, but you might have difficulty removing it intact. A springform pan is recommended for easy removal.
- Can I add more Easter eggs to the filling? Absolutely! You can chop up extra Easter eggs and fold them into the cheesecake filling for even more chocolate flavor.
Easter Egg Cheesecake
- Total Time: 6hours
Ingredients
For the Crust:
-
1 ½ cups digestive biscuits or graham cracker crumbs (halal-certified)
-
1/3 cup unsalted butter, melted
-
1/4 cup granulated sugar
-
A pinch of salt
For the Cheesecake Filling:
-
3 cups cream cheese (room temperature)
-
1 cup sour cream
-
1 cup powdered sugar
-
2 teaspoons vanilla extract
-
3 large eggs (room temperature)
-
2 tablespoons all-purpose flour
-
1/4 cup heavy cream
-
1 ½ cups colorful Easter eggs (halal chocolate eggs, or candy-coated chocolate eggs)
For the Topping:
-
Whipped cream (optional)
-
Extra crushed Easter eggs for garnish (optional)
-
Fresh mint leaves for decoration (optional)
Ingredient Highlights:
-
Digestive Biscuits/Graham Crackers: These provide the perfect base for the cheesecake with a buttery and crunchy texture. If you’re looking for a gluten-free alternative, use gluten-free crackers or biscuits.
-
Cream Cheese: The main ingredient for the cheesecake filling, cream cheese gives the dessert its rich and tangy flavor and smooth texture.
-
Sour Cream: Sour cream adds extra creaminess and a slight tanginess that helps balance the sweetness of the dessert.
-
Easter Eggs: The colorful Easter eggs are the star of the show, adding both visual appeal and a delightful surprise in every bite. You can choose halal-certified chocolate eggs or candy-coated chocolate eggs.
-
Vanilla Extract: This natural flavoring enhances the overall taste of the cheesecake, making it even more irresistible.
Instructions
Prepare the Crust:
-
Preheat the Oven: Preheat your oven to 325°F (160°C). Line a 9-inch springform pan with parchment paper or grease it lightly to prevent the crust from sticking.
-
Prepare the Crust: In a medium-sized bowl, mix together the crushed digestive biscuits or graham crackers, melted butter, granulated sugar, and a pinch of salt. Stir until the mixture is well combined.
-
Press the Crust: Pour the mixture into the prepared springform pan and press it down evenly to form a compact crust. Use the back of a spoon to press it firmly into the bottom.
-
Bake the Crust: Place the pan in the preheated oven and bake for 10 minutes, until the crust is lightly golden. Remove from the oven and set it aside to cool while you prepare the filling.
Make the Cheesecake Filling:
-
Beat the Cream Cheese: In a large bowl, beat the cream cheese with an electric mixer until it’s smooth and creamy. This will take about 2-3 minutes. Make sure the cream cheese is at room temperature to avoid lumps.
-
Add the Sugar and Sour Cream: Add the powdered sugar and sour cream to the cream cheese and continue mixing until everything is smooth and well combined.
-
Add Eggs One at a Time: Beat in the eggs one at a time, making sure each egg is fully incorporated before adding the next. Scrape down the sides of the bowl as needed.
-
Mix in the Vanilla and Flour: Add the vanilla extract and flour to the mixture, stirring gently to combine.
-
Add the Heavy Cream: Pour in the heavy cream and mix until the filling is smooth and thick.
Assemble the Cheesecake:
-
Pour the Filling into the Crust: Pour the cheesecake filling into the cooled crust, smoothing the top with a spatula. Gently tap the pan on the counter to release any air bubbles.
-
Add the Easter Eggs: Gently press the colorful Easter eggs into the top of the cheesecake filling. You can arrange them in a decorative pattern, such as a ring around the edge or a cluster in the center.
-
Bake the Cheesecake: Bake the cheesecake at 325°F (160°C) for 55-60 minutes. The center should be set but slightly jiggly when you tap the pan. Don’t worry if it cracks slightly; this is normal for cheesecakes.
-
Cool the Cheesecake: Once baked, turn off the oven and leave the cheesecake in the oven with the door slightly ajar for about an hour. This will help prevent cracking. After an hour, remove the cheesecake from the oven and let it cool completely at room temperature.
-
Chill the Cheesecake: Once the cheesecake has cooled to room temperature, cover it with plastic wrap and refrigerate for at least 4 hours or overnight to allow it to fully set.
Serve the Cheesecake:
-
Garnish and Serve: Before serving, top the cheesecake with a dollop of whipped cream, extra crushed Easter eggs, and a few fresh mint leaves for a decorative touch. Slice the cheesecake and enjoy the festive treat!
- Prep Time: 30minutes
Nutrition
- Serving Size: 12
- Calories: 400
- Fat: 24g
- Carbohydrates: 35g
- Protein: 6g
Conclusion of Easter Egg Cheesecake Recipe
Easter Egg Cheesecake is the ultimate dessert for celebrating Easter, with its creamy texture, festive topping, and sweet surprise of colorful Easter eggs. Whether you’re hosting a holiday gathering or simply craving something special, this cheesecake will be the star of any occasion. With its simple ingredients, easy preparation, and delicious flavor, Easter Egg Cheesecake is sure to become a family favorite for years to come. So, get baking and enjoy this irresistible treat with your loved ones!