

Discover the Kitchen Tool Everyone Is Raving About!
- • Precision Engineered: Sharp blade with durable craftsmanship.
- • Comfort First: Ergonomic design for effortless slicing.
- • Stylish & Strong: Elegant wood handle meets stainless steel strength.
- • Risk-Free Pick: Thousands of happy home chefs can’t be wrong.
- • Today’s Deal: Just $29.95 instead of $99.85 — limited-time offer!
This post may include affiliate links — learn more here .
Introduction
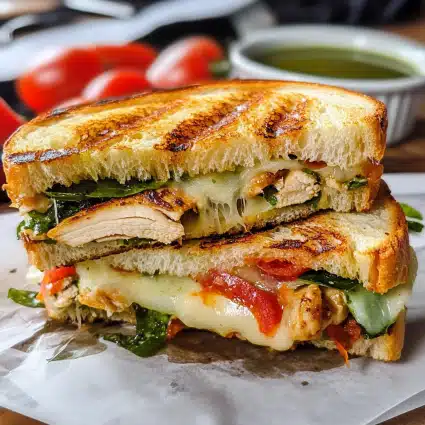
Ah, the panini! It’s the sandwich that knows how to turn a simple lunch into something extraordinary. There’s just something magical about the crispy, toasted bread, the warm, melty cheese, and the savory fillings that come together to create the perfect bite. But when you take that classic panini and stuff it with juicy Italian-seasoned chicken, fresh mozzarella, and a touch of basil, you’ve got a whole new level of deliciousness.
I discovered the joy of Italian chicken paninis a few years ago while traveling through Italy. Every café had its own take on the panini, but one that really stood out to me was a version filled with grilled chicken, fresh mozzarella, and a drizzle of balsamic glaze. It was simple yet packed with flavor, and I immediately knew I had to recreate it at home. Now, it’s one of my family’s favorite weeknight dinners. Whether we’re enjoying it for lunch, dinner, or even as a party appetizer, it’s always a crowd-pleaser.
What I love most about this Italian chicken panini is how versatile it is. You can use leftover grilled chicken, swap out the cheese for a different variety, or add extra veggies for a more substantial meal. Plus, it’s super easy to make and doesn’t take a lot of time—perfect for those busy days when you need a meal that feels indulgent without the effort.
Why You’ll Love This Recipe
Here’s why you’re going to fall head over heels for this Italian chicken panini:
- Quick and Easy: With just a few ingredients and less than 30 minutes, you can have a delicious meal ready. The simplicity of this recipe makes it perfect for busy weeknights or lazy weekends.
- Perfectly Balanced Flavors: The combination of juicy grilled chicken, creamy mozzarella, fresh basil, and tangy balsamic glaze creates a symphony of flavors. Each bite offers something different—a bit of savory, a bit of sweet, and a satisfying crunch from the toasted bread.
- Family-Friendly: This panini is loved by everyone in the family, from picky eaters to those who appreciate bold flavors. You can even get the kids involved in assembling their own paninis, which makes mealtime more fun.
- Customizable: You can switch up the ingredients to suit your tastes. Add roasted red peppers for an extra veggie kick, or use a different type of cheese, like provolone or fontina, if you’re craving something new.
- Portable and Mess-Free: Unlike other sandwiches, this panini won’t make a mess. It’s perfect for taking to work, picnics, or school lunches.
Trust me, once you make this Italian chicken panini, you’ll want to make it again and again. It’s the kind of recipe you’ll keep coming back to, whether you’re feeding a crowd or just making a quick meal for yourself.
Preparation Time and Servings
- Total Time: 20 minutes
- Prep Time: 10 minutes
- Cook Time: 10 minutes
- Servings: Serves 2-4 (depending on size of bread and chicken portions)
- Nutrition Facts (per serving):
- Calories: 450
- Protein: 35g
- Carbs: 40g
- Fat: 18g
Ingredients
For the Italian chicken panini, you’ll need:
- 2 boneless, skinless chicken breasts: Chicken breast is lean, easy to cook, and works perfectly in paninis. If you’re short on time, leftover grilled chicken also works great.
- 4 slices of ciabatta bread: Ciabatta has a rustic texture that holds up well to the fillings and gives you that crispy crunch on the outside. You can also use sourdough or French bread if you prefer.
- 1 cup fresh mozzarella cheese: Fresh mozzarella is key to getting that melty, gooey texture. You can use other cheeses like provolone or fontina if you’re looking for a different flavor profile.
- Fresh basil leaves: Fresh basil adds a pop of flavor and a burst of freshness that pairs beautifully with the chicken and mozzarella.
- 2 tbsp olive oil: For grilling the panini and adding richness to the bread.
- 1 tbsp balsamic glaze: This adds a touch of sweetness and acidity that takes the flavors to the next level. You can find balsamic glaze at most grocery stores, or you can make your own by reducing balsamic vinegar.
- Salt and pepper: To season the chicken and enhance the flavors.
Optional:
- Roasted red peppers: For a bit of extra flavor and a colorful addition to the panini.
Step-by-Step
 Instructions
- Season the Chicken: Start by seasoning the chicken breasts with salt and pepper on both sides. This helps to bring out the natural flavors of the chicken. For a bit of extra Italian flair, you can sprinkle some dried oregano, basil, or garlic powder on the chicken before cooking.
- Grill the Chicken: Heat a grill pan or regular skillet over medium-high heat. Drizzle the pan with olive oil to prevent sticking and add flavor. Once the pan is hot, place the chicken breasts in and cook for about 5-6 minutes per side, or until the internal temperature reaches 165°F (75°C) and the chicken is no longer pink inside. If you don’t have a grill pan, a regular skillet will work just as well.Tip: If you want to make the chicken more flavorful, you can marinate it in olive oil, garlic, lemon juice, and herbs for about 30 minutes before grilling.
- Rest the Chicken: After grilling, remove the chicken from the pan and let it rest for a few minutes. This step is crucial because it allows the juices to redistribute inside the chicken, keeping it moist and tender. Once rested, slice the chicken into thin, even strips.
- Prepare the Bread: While the chicken rests, slice the ciabatta bread into 2-3 inch thick pieces. If you’re using large loaves of bread, cut it into 4 equal pieces, depending on how big you want your paninis. Brush the outside of each slice of bread with olive oil to ensure a golden, crispy crust.Optional: If you like a bit of extra flavor, you can rub the bread with a garlic clove before brushing with olive oil.
- Assemble the Panini: Lay one slice of bread flat on a clean surface. Start by layering the fresh mozzarella cheese on the bread, followed by the sliced chicken. Place a few fresh basil leaves on top, and then drizzle a small amount of balsamic glaze over the chicken. Top with the second slice of bread.
- Grill the Panini: Heat a panini press or grill pan over medium-high heat. If you’re using a pan, place a heavy skillet or press on top of the panini to flatten it as it cooks. Grill the panini for about 3-4 minutes, or until the bread is golden brown and the cheese is melted. Flip the panini halfway through to ensure even grilling on both sides.
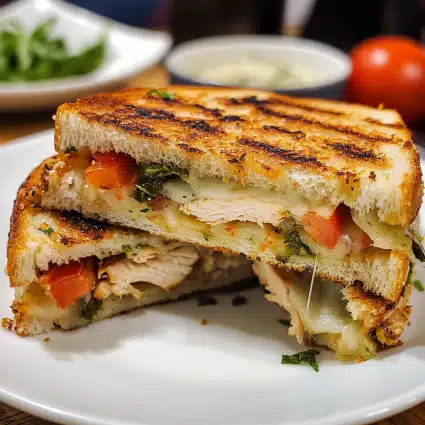
- Serve and Enjoy: Once the panini is golden and crispy on both sides, remove it from the grill. Let it sit for a minute before slicing to allow the cheese to set. Cut the panini into halves or quarters and serve with a side salad, chips, or roasted veggies.
How to Serve
- Classic Side Salad: Serve the Italian chicken panini with a fresh side salad made of mixed greens, cherry tomatoes, cucumber, and a light vinaigrette. The crispness of the salad complements the richness of the panini.
- Soup: Pair the panini with a cup of tomato basil soup or a creamy spinach soup for the ultimate comfort meal.
- Chips or Fries: For a more indulgent meal, serve the panini with a side of crispy potato chips or homemade fries.
- Extra Balsamic Glaze: Drizzle a bit of extra balsamic glaze on the panini before serving for added flavor and a touch of sweetness.
Additional Tips
- Use Leftover Chicken: This recipe is perfect for using up leftover grilled chicken. Just slice it thinly and follow the rest of the steps. It’s a great way to repurpose last night’s dinner!
- Grill the Bread: If you don’t have a panini press, you can still get that crispy texture by grilling the bread in a regular skillet or on a grill pan. Make sure to press it down with a heavy skillet to get that perfect, flat, crispy panini shape.
- Cheese Options: While fresh mozzarella is my favorite for this recipe, feel free to experiment with other types of cheese like provolone, fontina, or even a sharp cheddar for a different flavor profile.
- Add Veggies: For an extra boost of flavor and nutrition, add roasted red peppers, spinach, or arugula to the panini. These vegetables complement the chicken and cheese beautifully.
- Toast the Bread: Before assembling the panini, you can toast the inside of the bread lightly to prevent it from getting soggy. This step is especially helpful if you’re using a lot of sauce or juicy vegetables.
Recipe Variations
- Vegetarian Option: Replace the chicken with grilled portobello mushrooms or zucchini slices for a delicious vegetarian panini. The mushrooms have a meaty texture that pairs perfectly with the mozzarella and balsamic glaze.
- Spicy Kick: Add a few slices of jalapeños or a dash of crushed red pepper flakes to give your panini a little heat. It balances out the richness of the cheese and chicken perfectly.
- Herb Variations: Swap out the basil for fresh oregano or thyme for a slightly different, more earthy flavor. You can even mix in some fresh rosemary for an herby, aromatic twist.
- Add Pesto: For a more vibrant, herby flavor, spread a thin layer of pesto on the inside of the bread before adding the chicken and cheese. It adds a burst of flavor that pairs perfectly with the grilled chicken.
Serving Suggestions
- Side Dishes: Pair your panini with roasted vegetables, like zucchini, eggplant, and bell peppers, for a Mediterranean-inspired meal. You can also serve it with a simple pasta salad with olives, cherry tomatoes, and feta.
- Drinks: A chilled glass of iced tea or sparkling water makes for a refreshing drink alongside the panini. If you’re in the mood for something a bit heartier, serve it with a glass of chilled white wine, like Pinot Grigio, to complement the flavors.
- For Kids: If you’re serving this for a family dinner, serve the paninis with some homemade sweet potato fries or carrot sticks for a healthier twist.
Freezing and Storage
- Storage: Store leftover paninis in an airtight container in the fridge for up to 2 days. To reheat, place the panini in a skillet or panini press to get the bread crispy again.
- Freezing: You can freeze the assembled paninis before grilling. Wrap each panini tightly in foil or plastic wrap and store in a freezer bag for up to 3 months. To reheat, thaw in the fridge overnight and then grill the panini as directed. The bread may be slightly softer, but it will still be delicious!
Special Equipment
- Panini Press: This is the best tool for making paninis. It presses the sandwich down evenly and gives the bread that perfect, crispy texture.
- Grill Pan: If you don’t have a panini press, a grill pan will work just fine to get those beautiful grill marks and crispy bread.
- Heavy Skillet: You can also use a heavy skillet to press the panini down as it grills.
FAQ Section
- Can I use chicken thighs instead of breasts? Yes, chicken thighs will work great for this recipe! They’re a little juicier and more flavorful, though they may take a bit longer to cook.
- Can I make this ahead of time? While the paninis are best fresh, you can prepare the chicken and assemble the paninis ahead of time. Store them in the fridge and grill them just before serving.
- What kind of bread is best for paninis? Ciabatta is my go-to bread because it has the perfect texture for paninis. However, you can also use sourdough, baguette, or any hearty bread that can withstand grilling.
- Can I make this vegetarian? Absolutely! Replace the chicken with grilled vegetables, such as mushrooms, zucchini, or roasted red peppers. You could also add a layer of pesto for extra flavor.
- How do I prevent the panini from being soggy? Make sure to toast the inside of the bread lightly before assembling your panini. This helps prevent the bread from absorbing too much moisture. Also, be careful not to overfill your panini with too much sauce or moist ingredients.
Conclusion
An Italian chicken panini is more than just a meal—it’s an experience. The combination of savory grilled chicken, melty mozzarella, fragrant basil, and the tangy sweetness of balsamic glaze creates a symphony of flavors that will have you coming back for more. Whether you’re preparing it for a quick weeknight dinner or a weekend lunch, it’s an easy and delicious way to enjoy a taste of Italy in your own kitchen.
This recipe is incredibly versatile, allowing you to customize it with your favorite ingredients, making it perfect for any occasion. And with its simple prep and minimal cooking time, you’ll wonder why you haven’t made it sooner.
So, fire up that grill, assemble your paninis, and get ready to indulge in one of the most satisfying sandwiches you’ll ever eat. Enjoy!