


Discover the Kitchen Tool Everyone Is Raving About!
- • Precision Engineered: Sharp blade with durable craftsmanship.
- • Comfort First: Ergonomic design for effortless slicing.
- • Stylish & Strong: Elegant wood handle meets stainless steel strength.
- • Risk-Free Pick: Thousands of happy home chefs can’t be wrong.
- • Today’s Deal: Just $29.95 instead of $99.85 — limited-time offer!
This post may include affiliate links — learn more here .
Introduction
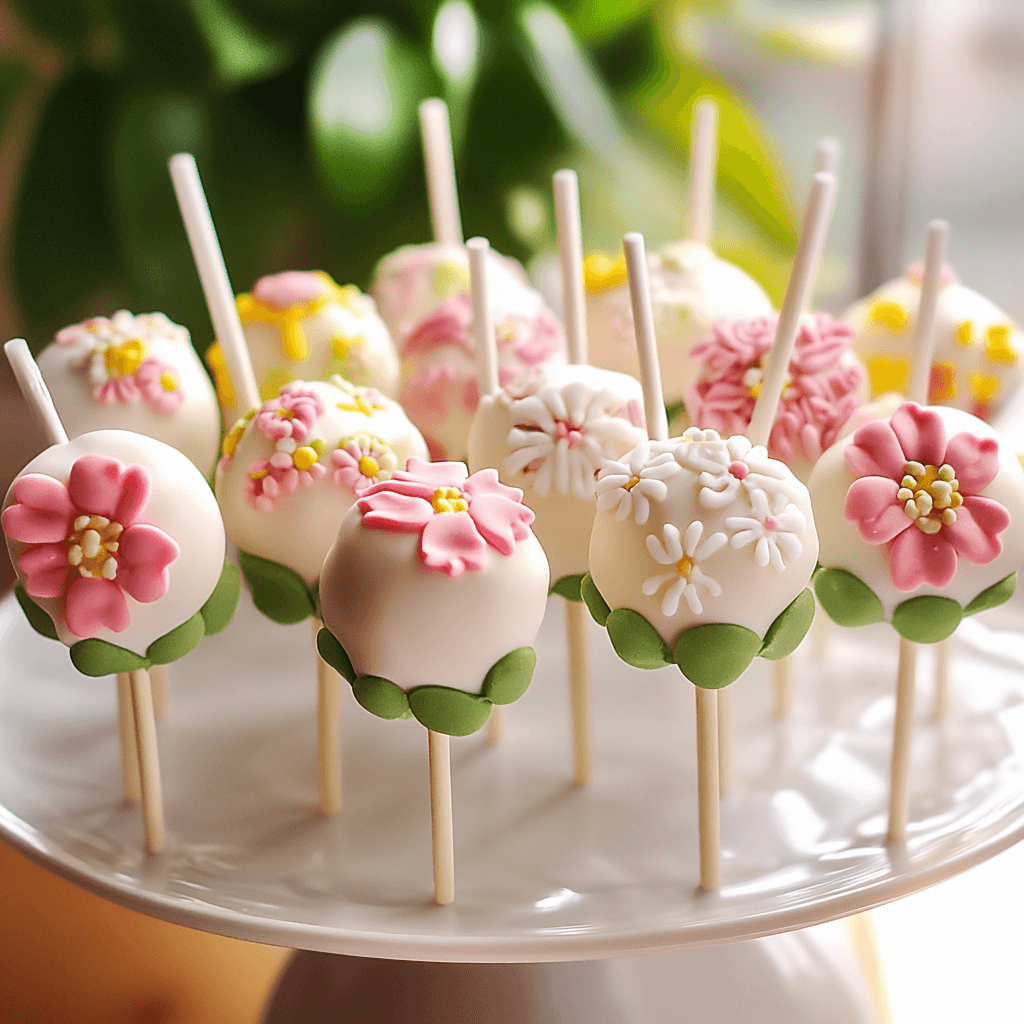
Spring Flower Cake Pops are delightful little treats that perfectly capture the essence of spring. With their soft, moist cake center, sweet coating, and colorful flower decorations, these cake pops are a fun and festive way to celebrate the season. The bright colors and floral designs make them an ideal choice for springtime events like Easter, baby showers, birthdays, or just a sweet treat to enjoy with family and friends. These cake pops are easy to make and can be customized with different flavors, fillings, and decorations to fit your taste. Whether you’re a novice baker or an experienced one, these Spring Flower Cake Pops are sure to bring a smile to everyone’s face.
Perfect for:
- Spring celebrations
- Easter gatherings
- Baby showers
- Birthday parties
- Afternoon tea or coffee
- Cake pop lovers
Why You’ll Love This Recipe: Spring Flower Cake Pops
Here’s why Spring Flower Cake Pops will become your go-to treat for any occasion:
- Fun and Festive: The bright, vibrant flower designs add a touch of cheer and whimsy to your spring events, making them perfect for celebrations.
- Moist and Delicious: The cake pops are made with moist cake, combined with frosting, which ensures every bite is rich and satisfying.
- Customizable: You can mix and match flavors and colors to create the perfect cake pop for your event or personal preference.
- Halal-Friendly: This recipe is completely halal, free of pork, bacon, and alcohol, so you can enjoy it with peace of mind at any gathering.
- Easy to Make: While cake pops may seem like an intricate dessert, the process is surprisingly simple with just a few ingredients and minimal effort.
Preparation and Cooking Time for Spring Flower Cake Pops
- Total Time: 2 hours
- Preparation Time: 30 minutes
- Baking Time: 30 minutes
- Decoration Time: 1 hour
- Servings: 20-25 cake pops
- Calories per Serving: Approximately 150-200 calories per cake pop
- Key Nutrients: Protein: 2g, Carbs: 25g, Fat: 8g
Ingredients for Spring Flower Cake Pops
Here’s what you’ll need to make these colorful and flavorful Spring Flower Cake Pops:
Cake:
- 1 box of vanilla cake mix (or homemade vanilla cake batter)
- 3 large eggs
- 1 cup whole milk (or any preferred milk substitute for a dairy-free version)
- 1/3 cup vegetable oil
- 1 teaspoon vanilla extract
Buttercream Frosting:
- 1 cup unsalted butter, softened
- 4 cups powdered sugar
- 2 tablespoons whole milk (or any preferred milk substitute for a dairy-free version)
- 1 teaspoon vanilla extract
- A pinch of salt
Decoration:
- 1-2 cups candy melts (white, yellow, pink, and purple are ideal for spring colors)
- Lollipop sticks or wooden skewers
- Sprinkles, edible glitter, or nonpareils for added decoration (optional)
- Flower-shaped sprinkles or edible flower decorations
- Food coloring (optional for more vibrant color in frosting and candy melts)
Ingredient Highlights:
- Cake Mix: Using a box cake mix ensures the cake pops are easy to prepare, but feel free to make the cake from scratch if desired.
- Butter: Softened butter creates a smooth frosting that binds the cake together perfectly while adding a rich, creamy texture.
- Candy Melts: The candy melts coat the cake pops and harden into a smooth shell, which can be colored to suit your theme.
- Sprinkles & Edible Flowers: Flower-shaped sprinkles and edible decorations give the cake pops their signature look, adding a touch of elegance and fun.
Step-by-Step

1: Prepare the Cake
- Preheat the Oven: Preheat your oven to 350°F (175°C). Grease and flour a 9×13-inch baking pan or line it with parchment paper.
- Mix the Cake Batter: In a large bowl, mix the vanilla cake mix with eggs, milk, oil, and vanilla extract (according to the instructions on the box or the recipe you’re following). Stir until fully combined and smooth.
- Bake the Cake: Pour the batter into the prepared pan and bake for 25-30 minutes, or until a toothpick inserted into the center comes out clean. Allow the cake to cool completely in the pan.
2: Crumble the Cake
- Crumble the Cake: Once the cake has cooled, crumble it into small pieces using your hands or a fork. The texture should be similar to breadcrumbs, and you should have about 4 cups of crumbled cake.
3: Prepare the Buttercream Frosting
- Make the Frosting: In a separate bowl, cream the softened butter until light and fluffy. Gradually add the powdered sugar, milk, vanilla extract, and a pinch of salt, continuing to mix until the frosting is smooth and spreadable.
- Combine Cake and Frosting: Add the buttercream frosting to the crumbled cake, about 1/4 cup at a time, mixing until the consistency is moist but not too wet. The mixture should be firm enough to form into balls, but not too crumbly.
4: Shape the Cake Pops
- Form the Cake Pops: Using your hands, roll the cake and frosting mixture into 1-inch balls. Place the cake balls onto a baking sheet lined with parchment paper. Make sure they are spaced evenly.
- Insert Lollipop Sticks: Melt a small amount of the candy melts and dip the end of each lollipop stick into the melted candy. Then, gently insert the stick into the center of each cake ball, about halfway through. This will help the sticks stay in place as the cake pops cool.
5: Coat the Cake Pops
- Melt the Candy Melts: In a microwave-safe bowl, melt the candy melts according to the instructions on the package. You can use a microwave or a double boiler. If you’re coloring the candy melts, divide them into bowls and add the desired food coloring to each batch.
- Dip the Cake Pops: Dip each cake pop into the melted candy melts, ensuring it’s fully coated. Tap the stick gently to remove any excess candy. You can choose a single color for all the pops or mix different colors for a more vibrant look.
- Decorate: Before the candy coating hardens, immediately decorate the cake pops with sprinkles, edible glitter, or flower-shaped decorations. For a spring touch, use flower-shaped sprinkles or edible flowers to create a beautiful design.
6: Let the Cake Pops Set
- Cool the Cake Pops: Stand the cake pops upright in a cup or cake pop holder and let them cool and harden for about 30 minutes at room temperature or in the fridge for quicker setting.
7: Serve and Enjoy
- Serve: Once the coating has completely set, your Spring Flower Cake Pops are ready to serve! Arrange them on a decorative platter or package them in cute gift boxes for sharing.
How to Serve Spring Flower Cake Pops
Spring Flower Cake Pops can be enjoyed in many different ways:
- At Spring Parties: These cake pops are the perfect addition to a spring-themed party, birthday, or baby shower. Their bright and cheerful colors are sure to be a hit with guests of all ages.
- As a Gift: Package the cake pops in decorative boxes or cellophane bags tied with ribbons for a thoughtful and sweet gift for loved ones.
- For Afternoon Tea: Pair these cake pops with tea or coffee for a fun and light treat during your afternoon break.
- At Easter Celebrations: These cake pops are perfect for Easter egg hunts or as part of a festive dessert spread.
- With Ice Cream: For a truly indulgent treat, serve these cake pops with a scoop of vanilla or strawberry ice cream for a spring-inspired dessert.
Additional Tips for Spring Flower Cake Pops
Here are some tips to help you perfect your Spring Flower Cake Pops:
- Don’t Overmix the Cake Batter: When preparing the cake batter, be careful not to overmix, as this can result in a dense texture. Mix until just combined for a light and fluffy cake.
- Chill the Cake Balls: If the cake pops are too soft or difficult to work with, refrigerate the cake balls for 15-20 minutes before dipping them into the candy melts. This will help them hold their shape.
- Use Quality Candy Melts: Using high-quality candy melts ensures a smooth and even coating that’s easy to work with. Avoid using regular chocolate as it may not harden properly on the cake pops.
- Experiment with Flavors: Try making the cake pops with different cake flavors such as chocolate, lemon, or strawberry to mix things up.
- Try Different Decorations: Get creative with the decorations—consider adding sugar flowers, colored sprinkles, or even chocolate drizzle to make your cake pops uniquely yours.
Recipe Variations of Spring Flower Cake Pops
Here are some fun variations to try with your Spring Flower Cake Pops:
- Chocolate Cake Pops: Use chocolate cake mix or a homemade chocolate cake recipe for a rich, chocolaty twist on these cake pops.
- Lemon Cake Pops: Add a touch of lemon zest to the cake mix for a refreshing citrus flavor that complements the sweetness of the frosting.
- Strawberry Cake Pops: Use strawberry cake mix or fresh strawberries in the batter for a fruity version of these cake pops.
- Coconut Cake Pops: Add shredded coconut to the cake batter and top with toasted coconut flakes for a tropical twist.
- Peanut Butter Cake Pops: Swirl in peanut butter into the frosting and drizzle some on top of the cake pops for a nutty and creamy treat.
- Carrot Cake Pops: Make carrot cake cake pops by using a carrot cake mix and adding cream cheese frosting for a deliciously spiced variation.
- Vanilla Almond Cake Pops: Add almond extract to the cake batter and frosting for a subtle, nutty flavor that enhances the sweetness.
- Mango Cake Pops: Mix in fresh mango puree or juice into the cake batter for a tropical flavor perfect for spring.
- Matcha Cake Pops: Add matcha powder to the cake mix for a subtle green tea flavor and a beautiful green hue.
- Red Velvet Cake Pops: Use red velvet cake and cream cheese frosting for a decadent and colorful option that’s perfect for special occasions.
Freezing and Storage for Spring Flower Cake Pops
- Freezing: If you want to prepare cake pops in advance, you can freeze them. After decorating, place the cake pops in a single layer on a baking sheet and freeze them for up to 3 months. Once frozen, transfer them to a zip-top bag or airtight container. To serve, let them thaw at room temperature.
- Storage: Store cake pops in an airtight container at room temperature for up to 1 week. They will stay fresh and moist, ready for any occasion.
Special Equipment for Spring Flower Cake Pops
Here are some special equipment items you may find helpful when making Spring Flower Cake Pops:
- Cake Pop Stand or Styrofoam Block: A stand or block helps keep the cake pops upright while they cool and set.
- Microwave-Safe Bowl: For melting the candy melts, a microwave-safe bowl makes the process quick and easy.
- Lollipop Sticks: These sticks hold the cake pops together and make them easy to dip and serve.
- Piping Bags: Use a piping bag to decorate the cake pops with additional frosting or melted candy for extra flair.
- Decorative Sprinkles: Add colorful sprinkles or edible glitter to make your cake pops more festive.
- Silicone Mat or Parchment Paper: A silicone mat or parchment paper makes it easier to handle the cake pops while they cool.
FAQ Section About Spring Flower Cake Pops
- Can I use store-bought frosting instead of homemade frosting? Yes, you can use store-bought frosting if you’re short on time. Just make sure it’s the right consistency for binding the cake balls.
- Can I make these cake pops without a stick? Yes, you can shape the cake balls into small spheres and serve them as bite-sized treats without sticks.
- Can I use gluten-free cake mix for these cake pops? Yes, you can substitute gluten-free cake mix for a gluten-free version of the cake pops. Be sure to check the texture and consistency of the batter before forming the balls.
- How do I prevent the cake pops from cracking? Make sure the cake pops are properly cooled before dipping in the candy melts. Also, avoid using too much candy melt at once to prevent cracks.
- How long do these cake pops last? Cake pops can last up to a week at room temperature if stored in an airtight container.
Spring Flower Cake Pops
- Total Time: 2hours
Ingredients
For the Cake:
- 1 box of vanilla cake mix (or homemade vanilla cake batter)
- 3 large eggs
- 1 cup whole milk (or any preferred milk substitute for a dairy-free version)
- 1/3 cup vegetable oil
- 1 teaspoon vanilla extract
For the Buttercream Frosting:
- 1 cup unsalted butter, softened
- 4 cups powdered sugar
- 2 tablespoons whole milk (or any preferred milk substitute for a dairy-free version)
- 1 teaspoon vanilla extract
- A pinch of salt
For the Decoration:
- 1–2 cups candy melts (white, yellow, pink, and purple are ideal for spring colors)
- Lollipop sticks or wooden skewers
- Sprinkles, edible glitter, or nonpareils for added decoration (optional)
- Flower-shaped sprinkles or edible flower decorations
- Food coloring (optional for more vibrant color in frosting and candy melts)
Ingredient Highlights:
- Cake Mix: Using a box cake mix ensures the cake pops are easy to prepare, but feel free to make the cake from scratch if desired.
- Butter: Softened butter creates a smooth frosting that binds the cake together perfectly while adding a rich, creamy texture.
- Candy Melts: The candy melts coat the cake pops and harden into a smooth shell, which can be colored to suit your theme.
- Sprinkles & Edible Flowers: Flower-shaped sprinkles and edible decorations give the cake pops their signature look, adding a touch of elegance and fun.
Instructions
Step 1: Prepare the Cake
- Preheat the Oven: Preheat your oven to 350°F (175°C). Grease and flour a 9×13-inch baking pan or line it with parchment paper.
- Mix the Cake Batter: In a large bowl, mix the vanilla cake mix with eggs, milk, oil, and vanilla extract (according to the instructions on the box or the recipe you’re following). Stir until fully combined and smooth.
- Bake the Cake: Pour the batter into the prepared pan and bake for 25-30 minutes, or until a toothpick inserted into the center comes out clean. Allow the cake to cool completely in the pan.
Step 2: Crumble the Cake
- Crumble the Cake: Once the cake has cooled, crumble it into small pieces using your hands or a fork. The texture should be similar to breadcrumbs, and you should have about 4 cups of crumbled cake.
Step 3: Prepare the Buttercream Frosting
- Make the Frosting: In a separate bowl, cream the softened butter until light and fluffy. Gradually add the powdered sugar, milk, vanilla extract, and a pinch of salt, continuing to mix until the frosting is smooth and spreadable.
- Combine Cake and Frosting: Add the buttercream frosting to the crumbled cake, about 1/4 cup at a time, mixing until the consistency is moist but not too wet. The mixture should be firm enough to form into balls, but not too crumbly.
Step 4: Shape the Cake Pops
- Form the Cake Pops: Using your hands, roll the cake and frosting mixture into 1-inch balls. Place the cake balls onto a baking sheet lined with parchment paper. Make sure they are spaced evenly.
- Insert Lollipop Sticks: Melt a small amount of the candy melts and dip the end of each lollipop stick into the melted candy. Then, gently insert the stick into the center of each cake ball, about halfway through. This will help the sticks stay in place as the cake pops cool.
Step 5: Coat the Cake Pops
- Melt the Candy Melts: In a microwave-safe bowl, melt the candy melts according to the instructions on the package. You can use a microwave or a double boiler. If you’re coloring the candy melts, divide them into bowls and add the desired food coloring to each batch.
- Dip the Cake Pops: Dip each cake pop into the melted candy melts, ensuring it’s fully coated. Tap the stick gently to remove any excess candy. You can choose a single color for all the pops or mix different colors for a more vibrant look.
- Decorate: Before the candy coating hardens, immediately decorate the cake pops with sprinkles, edible glitter, or flower-shaped decorations. For a spring touch, use flower-shaped sprinkles or edible flowers to create a beautiful design.
Step 6: Let the Cake Pops Set
- Cool the Cake Pops: Stand the cake pops upright in a cup or cake pop holder and let them cool and harden for about 30 minutes at room temperature or in the fridge for quicker setting.
Step 7: Serve and Enjoy
- Serve: Once the coating has completely set, your Spring Flower Cake Pops are ready to serve! Arrange them on a decorative platter or package them in cute gift boxes for sharing.
- Prep Time: 30minutes
Nutrition
- Serving Size: 25
- Calories: 200
- Fat: 8g
- Carbohydrates: 25g
- Protein: 2g
Conclusion of Spring Flower Cake Pops
Spring Flower Cake Pops are a delightful and festive treat perfect for any springtime occasion. With their soft, flavorful cake, creamy frosting, and beautiful flower decorations, they’ll surely be a hit at your next celebration. Easy to make, customizable, and halal-friendly, these cake pops are a fun way to welcome the season with sweet, cheerful treats. Whether you’re celebrating Easter, a birthday, or just enjoying a spring afternoon, these cake pops are sure to brighten everyone’s day. Happy baking!