


Discover the Kitchen Tool Everyone Is Raving About!
- • Precision Engineered: Sharp blade with durable craftsmanship.
- • Comfort First: Ergonomic design for effortless slicing.
- • Stylish & Strong: Elegant wood handle meets stainless steel strength.
- • Risk-Free Pick: Thousands of happy home chefs can’t be wrong.
- • Today’s Deal: Just $29.95 instead of $99.85 — limited-time offer!
This post may include affiliate links — learn more here .
Introduction
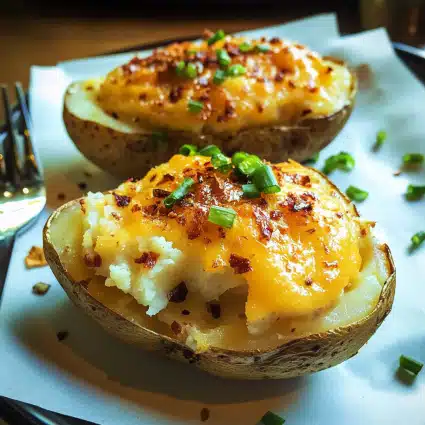
There’s something undeniably comforting about a baked potato—crispy on the outside, soft on the inside, with endless possibilities for toppings. But what happens when you take that classic baked potato and elevate it into a twice-baked masterpiece? The result is pure potato perfection. Twice baked potatoes are like the ultimate comfort food, taking that simple, humble spud and transforming it into a creamy, cheesy, crispy delight that will have everyone coming back for more.
If you’ve never tried making twice-baked potatoes before, let me tell you—it’s easier than you think! All you have to do is bake your potatoes, scoop out the insides, and mix the fluffy potato flesh with creamy cheese, butter, sour cream, and seasonings. Then, stuff the mixture back into the skins, bake again, and voilà—you have a golden, cheesy masterpiece. It’s a dish that feels fancy enough for a special dinner yet simple enough for a weeknight side dish.
This recipe has been a family favorite in our house for years. I first learned how to make twice-baked potatoes from my mom, who would whip them up for holiday dinners and family gatherings. Now, they’re a regular in our weeknight rotation. The kids love them, and I love how easy they are to customize! From adding bacon and green onions to swapping in different cheeses, twice-baked potatoes are as versatile as they are delicious.
So, grab your russet potatoes, your favorite toppings, and let’s get baking. I can promise you that once you try these, they’ll quickly become a regular part of your meal planning!
Why You’ll Love This Recipe
There are so many reasons why twice-baked potatoes are an absolute must-try. Here’s why:
- Easy to Make: While the concept sounds fancy, making twice-baked potatoes is incredibly straightforward. Once you bake your potatoes, it’s all about mixing, stuffing, and baking again—no complicated steps required!
- Customizable: You can make these potatoes exactly the way you want them. Add crispy bacon, sautéed mushrooms, or extra cheese—the possibilities are endless.
- Comfort Food, Elevated: Twice-baked potatoes take the classic baked potato to the next level. With a creamy, cheesy filling and crispy edges, every bite is a perfect blend of textures and flavors.
- Perfect for Any Occasion: Whether it’s a casual family dinner or a special holiday meal, twice-baked potatoes are always a hit. They pair wonderfully with steaks, chicken, or even a simple salad for a complete meal.
Each bite of these twice-baked potatoes is a little piece of comfort, and the best part is, you can adapt the recipe to suit whatever you have in your fridge or pantry.
Preparation Time and Servings
Total Time: 1 hour 30 minutes
- Prep Time: 15 minutes
- Cook Time: 1 hour 15 minutes
- Servings: Serves 4-6 people (2 halves per person)
- Nutrition Facts (per serving):
Calories: 350
Protein: 7g
Carbs: 40g
Fat: 20g
Ingredients
For this classic twice-baked potato recipe, you’ll need the following ingredients:
- 4 large russet potatoes: Russet potatoes are the perfect choice for twice-baked potatoes because they have a thick skin and a fluffy interior that makes for a great texture after baking.
- 1/2 cup sour cream: Adds creaminess and a tangy flavor to the filling.
- 1/2 cup shredded cheddar cheese: The star of the filling. Cheddar provides the perfect meltiness and flavor.
- 1/4 cup milk: To make the filling extra smooth and creamy.
- 2 tbsp butter: Adds richness and a velvety texture to the potato filling.
- Salt and pepper: For seasoning, don’t skip this—seasoning makes all the difference!
- 2 green onions, chopped: For a little fresh bite and color.
- Bacon bits or crumbled cooked bacon (optional): If you’re a bacon fan, this is a must for that crispy, savory element.
- Chopped fresh parsley (optional): For garnish and a pop of color.
- Shredded cheese (optional): For topping before the second bake for extra cheesy goodness.
Step-by-Step
 Instructions
- Preheat your oven to 400°F (200°C). You’ll want your oven nice and hot for baking the potatoes to get that crispy skin.
- Wash and scrub the potatoes: Since you’ll be eating the potato skin, make sure to give them a good scrub under running water. Pat them dry with a towel.
- Pierce the potatoes with a fork a few times: This step helps the steam escape while baking, preventing the potatoes from exploding in the oven (which, trust me, is not fun).
- Bake the potatoes: Place the potatoes directly on the oven rack or a baking sheet. Bake for about 45-60 minutes, or until they’re tender when pierced with a fork. The skins should be crisp, and the insides soft and fluffy.
- Cool slightly: After the potatoes are baked, let them cool for a few minutes so you can handle them. You don’t want to burn your hands, but you also don’t want them too cool to scoop out the insides!
- Cut the potatoes in half lengthwise: Use a sharp knife to slice the potatoes in half. Be careful as the potatoes will still be hot inside.
- Scoop out the flesh: Gently scoop out the potato flesh with a spoon, leaving about 1/4 inch of the potato along the skin. Be careful not to tear the skin—this is where the filling will go! Place the scooped-out potato in a bowl, and don’t worry if it’s a little messy—it’ll all come together soon.
- Mash the potato: Add the butter, sour cream, milk, salt, and pepper to the bowl with the potato flesh. Use a potato masher or fork to mash everything together until it’s smooth and creamy. Taste the mixture and adjust the seasoning as needed.
- Mix in the cheese and green onions: Stir in the shredded cheddar cheese and green onions. If you’re using bacon, now’s the time to add it in! Mix everything until it’s well combined.
- Stuff the potatoes: Spoon the creamy potato mixture back into the potato skins. Be generous with the filling—it should mound up a little above the skin.
- Top with extra cheese (optional): For an extra cheesy topping, sprinkle some shredded cheese on top of the stuffed potatoes. This will melt into a delicious golden crust when baked.
- Bake again: Place the stuffed potatoes on a baking sheet and return them to the oven. Bake for an additional 15-20 minutes, or until the cheese is melted, bubbly, and golden brown. If you like an extra crispy top, you can broil them for the last 2-3 minutes.
- Garnish and serve: Once they’re out of the oven, sprinkle the potatoes with fresh parsley, extra green onions, or bacon bits for garnish. Serve them hot, and watch everyone dive in!
How to Serve
Twice-baked potatoes are the perfect side dish, but they’re hearty enough to stand on their own as a main dish too. Here are some great ways to serve them:
- With a steak or grilled chicken: Twice-baked potatoes are the ideal accompaniment to a juicy steak or grilled chicken breast. The creamy filling pairs perfectly with savory meats.
- As a main dish: If you’re looking for a filling vegetarian option, serve these potatoes with a side of salad or steamed vegetables.
- With a simple soup: Pair them with a light soup, like a creamy tomato bisque, for a comforting meal.
Additional Tips
- Choose the right potatoes: Russet potatoes are the best choice for twice-baked potatoes. They have a fluffy interior and thick skin that holds up well during the second bake. Avoid using waxy potatoes like red potatoes, as they won’t yield the same creamy texture.
- Don’t overcook the potatoes the first time: When baking the potatoes, be sure they’re tender but not mushy. Overcooking them in the first bake can result in a soggy filling after the second bake.
- Add extra flavors: Feel free to customize the filling with extra ingredients like sautéed mushrooms, spinach, or even shredded BBQ chicken for a fun twist.
- Make ahead: Twice-baked potatoes are perfect for meal prep. You can bake and stuff the potatoes ahead of time, then store them in the fridge for up to 2 days. When you’re ready to eat, just pop them in the oven to bake again.
- Make them lighter: If you’re looking for a lighter version, you can substitute Greek yogurt for sour cream or use a lighter cheese. You can also skip the bacon and load them with veggies for a healthier alternative.
Recipe Variations
- Bacon and Cheddar: Add crispy bacon bits to the filling for an irresistible smoky flavor. Top with extra bacon on the outside for even more crunch.
- Vegetarian: Keep the potatoes vegetarian by skipping the bacon and loading them up with sautéed spinach, mushrooms, and bell peppers.
- BBQ Chicken: For a more hearty version, stir in shredded BBQ chicken and top with a drizzle of extra barbecue sauce for a smoky twist.
- Spicy Jalapeño: If you love a bit of heat, add diced jalapeños and a sprinkle of cayenne pepper to the filling. Top with a few slices of fresh jalapeño for an extra kick.
- Loaded Twice-Baked Potatoes: Add all your favorite “loaded” potato toppings—sour cream, cheese, bacon, chives, and even a dollop of chili for a fully-loaded version.
Serving Suggestions
Side Dishes: These twice-baked potatoes are great with roasted vegetables, like Brussels sprouts or carrots. You could also pair them with a light salad for a refreshing contrast.
- Wine Pairings: A crisp white wine like Chardonnay or Sauvignon Blanc works wonderfully with the creamy richness of the potatoes. If you prefer red wine, go with a medium-bodied wine like Merlot.
- For Kids: Serve the potatoes with a side of green beans or corn on the cob for a kid-friendly meal.
Freezing and Storage
Storage: Leftover twice-baked potatoes can be stored in the fridge for up to 3 days. To store, place them in an airtight container or wrap them in foil. Reheat them in the oven at 350°F for about 15-20 minutes, or until heated through.
- Freezing: You can freeze twice-baked potatoes for later use. After the second bake, let the potatoes cool completely before wrapping them in foil or placing them in a freezer-safe container. When you’re ready to eat, reheat them in the oven at 350°F for about 25-30 minutes, or until they’re hot and the cheese is melted.
Special Equipment
- Baking Sheet: You’ll need a baking sheet to place the potatoes on while they bake.
- Potato Masher: To achieve a smooth and creamy filling, a potato masher works best for mashing the potato.
- Aluminum Foil: If you want to keep the potatoes warm or freeze them, aluminum foil is a handy tool.
FAQ Section
- Can I make these potatoes ahead of time? Yes! You can prep the potatoes a day in advance and store them in the fridge. When you’re ready to bake, just pop them in the oven for the second bake.
- Can I use other types of cheese? Absolutely! Feel free to experiment with different cheeses like mozzarella, gouda, or even blue cheese for a unique flavor.
- Can I make these potatoes without bacon? Yes! You can easily make them vegetarian by omitting the bacon and adding more veggies or cheese for extra flavor.
- Can I freeze twice-baked potatoes? Yes! These potatoes freeze really well. Wrap them tightly in foil or place them in a freezer-safe bag or container, and you can keep them in the freezer for up to 3 months.
Conclusion
I hope you’re as excited as I am about this twice-baked potato recipe. It’s simple, customizable, and guaranteed to impress. Whether you’re hosting a dinner party or just looking for a comforting side dish, these potatoes are sure to be a hit. With creamy fillings, crispy skins, and the option to add your favorite toppings, twice-baked potatoes are a crowd-pleasing dish that everyone will love.
So next time you’re in the mood for something hearty and satisfying, give this recipe a try. You won’t be disappointed!