

Discover the Kitchen Tool Everyone Is Raving About!
- • Precision Engineered: Sharp blade with durable craftsmanship.
- • Comfort First: Ergonomic design for effortless slicing.
- • Stylish & Strong: Elegant wood handle meets stainless steel strength.
- • Risk-Free Pick: Thousands of happy home chefs can’t be wrong.
- • Today’s Deal: Just $29.95 instead of $99.85 — limited-time offer!
This post may include affiliate links — learn more here .
Introduction
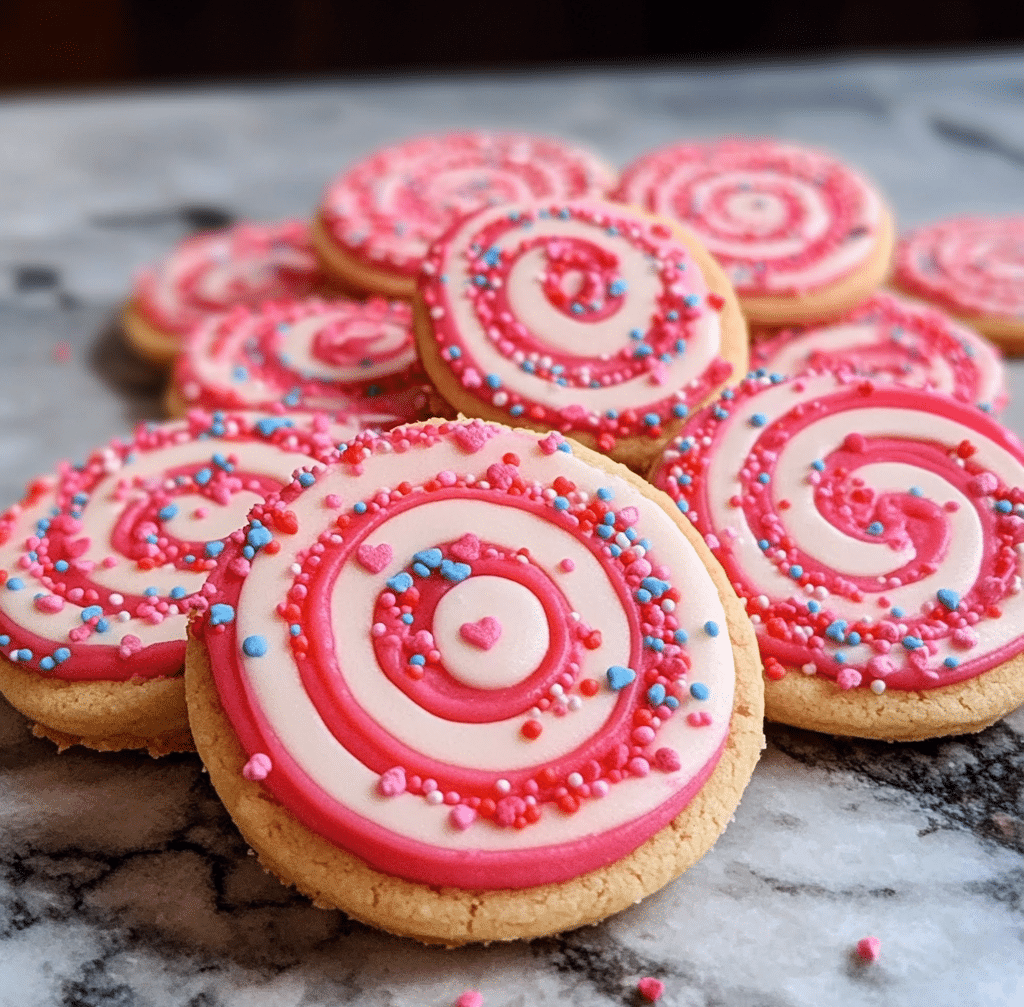
Valentine’s Day Pinwheel Cookies are a charming and delightful treat perfect for celebrating the season of love. With their vibrant red and pink swirl patterns, these cookies are as pleasing to the eyes as they are to the taste buds. The combination of buttery, tender dough and the fun, festive swirl design makes these cookies ideal for gifting or serving at your next celebration. These cookies are soft, slightly crisp around the edges, and packed with a delicate vanilla flavor. Whether you’re preparing a sweet treat for your loved ones, hosting a Valentine’s Day gathering, or simply indulging your sweet tooth, Valentine’s Day Pinwheel Cookies are the perfect choice.
Perfect for:
- Valentine’s Day parties and events
- Gifting for friends, family, or a loved one
- Afternoon tea or coffee breaks
- Fun baking project for kids
- Sweet additions to a dessert table
Why You’ll Love This Recipe: Valentine’s Day Pinwheel Cookies
Here’s why Valentine’s Day Pinwheel Cookies will be your new go-to dessert for the holiday:
- Festive and Fun Design: The bold red and pink swirl design of these cookies makes them stand out at any occasion, spreading love and cheer.
- Buttery and Delicious: Made with simple ingredients like butter, sugar, and vanilla extract, these cookies offer a melt-in-your-mouth texture with every bite.
- Easy to Customize: You can play with different colors or flavorings to make the pinwheels your own. Try adding a touch of almond or orange zest, or use colored sugar for an extra pop.
- Halal-Friendly: This recipe contains no pork, alcohol, or any ingredients that would violate Halal dietary laws, ensuring that everyone can enjoy these cookies without worry.
- Great for Gifting: The pretty swirl design makes these cookies an excellent homemade gift that will impress anyone who receives them.
Preparation and Cooking Time
- Total Time: 2 hours
- Preparation Time: 45 minutes
- Chilling Time: 1 hour
- Baking Time: 10-12 minutes
- Servings: Approximately 24 cookies
- Calories per serving: Approximately 150-170 calories
- Key Nutrients: Protein: 1g, Carbs: 20g, Fat: 8g
Ingredients for Valentine’s Day Pinwheel Cookies
To create these adorable and delicious Valentine’s Day Pinwheel Cookies, you’ll need the following ingredients:
- 1 cup (2 sticks) unsalted butter, softened
- 1 cup granulated sugar
- 1 large egg
- 2 teaspoons vanilla extract
- 2 ½ cups all-purpose flour
- 1 teaspoon baking powder
- ¼ teaspoon salt
- Red and pink food coloring (gel preferred for vibrant color)
- ¼ cup powdered sugar (for dusting, optional)
Ingredient Highlights
- Butter: The buttery base of the cookie dough gives it that rich, melt-in-your-mouth flavor, contributing to the cookie’s soft texture.
- Sugar: Granulated sugar sweetens the dough and helps create the slightly crisp edges that make these cookies irresistible.
- Vanilla Extract: This adds depth of flavor to the dough, making the simple recipe even more delightful.
- Food Coloring: A small amount of food coloring is used to make the vibrant swirls. Gel food coloring is ideal because it provides intense, bright colors without affecting the dough’s consistency.
Step-by-Step

Follow these simple steps to make your Valentine’s Day Pinwheel Cookies.
Prepare the Cookie Dough:
- Cream the Butter and Sugar: In a large mixing bowl, use an electric mixer or hand whisk to cream the softened butter and granulated sugar together until light and fluffy. This should take about 2-3 minutes.
- Add the Egg and Vanilla: Beat in the egg, followed by the vanilla extract, until the mixture is well combined.
- Mix the Dry Ingredients: In a separate bowl, whisk together the flour, baking powder, and salt. Gradually add the dry ingredients to the wet ingredients, mixing until just combined. Do not overwork the dough.
- Divide the Dough: Divide the dough into two equal portions. You can do this by cutting the dough in half or using a kitchen scale for accuracy.
Add Color to the Dough:
- Color the Dough: To one portion of dough, add a few drops of red food coloring. Start with a small amount and knead it in until you achieve a bright red color. Repeat this process with the second portion of dough, using pink food coloring. If you want a more intense color, feel free to add more food coloring until you’re satisfied with the shade.
- Chill the Dough: Wrap each portion of colored dough in plastic wrap and place them in the refrigerator for at least 30 minutes. Chilling the dough helps make it easier to roll out and prevents it from spreading too much while baking.
Roll and Shape the Pinwheels:
- Roll Out the Dough: On a lightly floured surface, roll each portion of dough into a rectangle. Aim for about ⅛ inch thickness. If the dough is too soft, you can refrigerate it again for 10-15 minutes to firm it up.
- Stack the Dough: Carefully stack the two colored dough rectangles on top of each other. You may need to trim the edges to ensure they line up properly. Use a rolling pin to gently press the dough together.
- Roll the Dough into a Log: Starting from one edge, roll the dough tightly into a log shape. Be gentle to keep the layers intact and avoid squeezing too tightly. Once rolled, wrap the dough log in plastic wrap and chill it for 30 minutes to 1 hour.
Slice and Bake the Cookies:
- Preheat the Oven: Preheat your oven to 350°F (175°C). Line a baking sheet with parchment paper or a silicone baking mat.
- Slice the Dough: Remove the dough log from the refrigerator and slice it into ¼-inch thick rounds. Arrange the cookies on the prepared baking sheet, spacing them about 1 inch apart.
- Bake: Bake for 10-12 minutes or until the edges are golden brown. Keep an eye on the cookies, as baking times may vary depending on your oven.
- Cool: Allow the cookies to cool on the baking sheet for 5 minutes before transferring them to a wire rack to cool completely.
Dust and Serve:
- Dust with Powdered Sugar: If desired, lightly dust the cooled cookies with powdered sugar for an extra touch of sweetness and elegance.
- Serve: Your Valentine’s Day Pinwheel Cookies are now ready to enjoy! Serve them at a party, as a gift, or with a warm cup of tea or coffee.

How to Serve Valentine’s Day Pinwheel Cookies
These festive cookies can be served in various ways to make your Valentine’s Day extra special.
- With Hot Beverages: Serve the cookies alongside hot chocolate, coffee, or tea for an indulgent, cozy treat.
- As a Dessert Platter: Pair these cookies with other Valentine’s-themed desserts like chocolate-dipped strawberries or heart-shaped brownies for a charming dessert table.
- Gift Packaging: Package these cookies in a cute jar, box, or cellophane bag tied with a ribbon. They make a thoughtful and delicious homemade gift for loved ones.
- On a Cookie Tray: Arrange the cookies on a tray with other sweets, creating a visually appealing and delightful spread for a Valentine’s Day party.
Additional Tips for Valentine’s Day Pinwheel Cookies
Here are some useful tips to ensure your Valentine’s Day Pinwheel Cookies turn out perfectly:
- Work with Chilled Dough: Ensure the dough is chilled before rolling it out. Cold dough is easier to handle and will hold its shape better while baking.
- Avoid Overmixing the Dough: When combining the dry ingredients with the wet ingredients, mix just until incorporated. Overmixing can lead to dense cookies.
- Use Gel Food Coloring: Gel food coloring provides vibrant, consistent colors without changing the texture of the dough. Liquid food coloring may alter the consistency, so gel is a better option.
- Customize the Colors: Feel free to experiment with different color combinations to match your Valentine’s Day theme. You could try using purple and pink or red and white for a romantic look.
- Make Ahead: You can prepare the dough ahead of time and keep it chilled for up to 3 days before rolling and baking.
Recipe Variations for Valentine’s Day Pinwheel Cookies
Here are 5 fun variations of Valentine’s Day Pinwheel Cookies that you can try:
- Chocolate Pinwheel Cookies: Add ¼ cup of unsweetened cocoa powder to one of the dough portions to create a chocolate and vanilla swirl.
- Berry Pinwheels: Incorporate freeze-dried berry powder (like strawberry or raspberry) into the dough for a fruity twist.
- Lemon Pinwheels: Add lemon zest to the dough for a fresh citrusy flavor that pairs wonderfully with the vanilla base.
- Sprinkle Pinwheels: Roll the finished dough log in colorful sprinkles before slicing for an extra festive touch.
- Coconut Pinwheels: Add shredded coconut to one of the dough portions for a tropical flair that complements the sweetness of the cookies.
Freezing and Storage for Valentine’s Day Pinwheel Cookies
- Freezing: To freeze the dough, wrap it tightly in plastic wrap and then in aluminum foil. It can be frozen for up to 3 months. When ready to bake, thaw the dough in the refrigerator before slicing and baking as usual.
- Storage: Store the baked cookies in an airtight container at room temperature for up to 1 week. For longer storage, keep them in the freezer for up to 3 months.
Special Equipment for Valentine’s Day Pinwheel Cookies
Here are 5 essential pieces of equipment for making these delightful cookies:
- Electric Mixer: An electric mixer helps you cream the butter and sugar quickly and efficiently.
- Rolling Pin: A rolling pin is crucial for rolling out the dough evenly to create the perfect swirls.
- Parchment Paper or Silicone Mat: Prevent sticking and ensure easy cleanup by lining your baking sheet with parchment paper or a silicone baking mat.
- Wire Rack: A wire rack is ideal for cooling the cookies evenly without them becoming soggy.
- Plastic Wrap: Use plastic wrap to chill and store the dough or to roll it into a log shape.
FAQ Section for Valentine’s Day Pinwheel Cookies
- Can I use a different type of food coloring? Yes, you can use liquid food coloring, but gel food coloring is preferred for the brightest, most vibrant colors.
- How can I prevent my cookies from spreading too much? Chilling the dough before rolling and baking will help the cookies hold their shape better and prevent spreading.
- Can I use margarine instead of butter? While you can use margarine, the cookies may not have the same rich, buttery flavor. Unsalted butter is recommended for the best result.
- Can I add flavorings like almond or lemon zest? Yes, feel free to add a teaspoon of almond extract or citrus zest to enhance the flavor of the dough.
- How do I know when the cookies are done baking? The cookies are done when the edges are golden, but the center is still soft. They’ll firm up as they cool.
Valentine’s Day Pinwheel Cookies
- Total Time: 2hours
Ingredients
For the Cookie Dough:
- 2 ¾ cups all-purpose flour
- 1 teaspoon baking powder
- ¼ teaspoon salt
- 1 cup (2 sticks) unsalted butter, softened
- 1 cup granulated sugar
- 1 large egg
- 1 teaspoon vanilla extract
- 1 teaspoon almond extract (optional for extra flavor)
- 2 tablespoons milk (or dairy-free alternative)
For the Royal Icing:
- 2 egg whites (or use powdered egg whites for a halal version)
- 2 ½ cups powdered sugar, sifted
- 1 teaspoon lemon juice or water (to adjust consistency)
- Gel food coloring (red, black, white, and pink for Mickey and Minnie designs)
- A pinch of cream of tartar (optional, for stiffening)
Ingredient Highlights
- Butter: The softened butter creates a rich, smooth dough that helps the cookies bake to a perfect consistency—soft and slightly chewy.
- Sugar: Granulated sugar sweetens the dough and gives the cookies a delicate crisp on the edges.
- Vanilla and Almond Extract: These extracts enhance the flavor of the cookies and give them a delightful aroma.
- Royal Icing: Royal icing is the perfect medium for decorating sugar cookies. It hardens beautifully, allowing for intricate designs like Mickey and Minnie’s faces and heart shapes.
- Gel Food Coloring: For decorating, gel food coloring is ideal because it creates vibrant, long-lasting colors without watering down the icing.
Instructions
Prepare the Cookie Dough:
- Preheat the Oven: Preheat your oven to 350°F (175°C). Line two baking sheets with parchment paper or silicone baking mats to prevent the cookies from sticking.
- Mix the Dry Ingredients: In a medium bowl, whisk together the flour, baking powder, and salt. Set aside.
- Cream the Butter and Sugar: In a large mixing bowl, beat the softened butter and granulated sugar together until light and fluffy (about 2-3 minutes).
- Add Wet Ingredients: Beat in the egg, vanilla extract, and almond extract (if using). Mix until fully combined.
- Combine Wet and Dry Ingredients: Gradually add the dry ingredients to the butter mixture, mixing on low speed. Add the milk and continue mixing until a soft dough forms. The dough should come together and not be too sticky.
- Chill the Dough: Divide the dough in half, flatten it into discs, wrap each in plastic wrap, and refrigerate for at least 30 minutes. Chilling the dough helps prevent the cookies from spreading too much while baking.
Roll Out and Cut the Cookies:
- Roll Out the Dough: Once chilled, remove the dough from the fridge and roll it out on a lightly floured surface to about ¼-inch thickness.
- Cut the Cookies: Use a heart-shaped or round cookie cutter to cut out the cookies. If you want to create Mickey and Minnie shapes, use a heart cutter for the body and two round cutters for the ears. Place the cookies on the prepared baking sheets.
- Bake the Cookies: Bake the cookies in the preheated oven for 10-12 minutes or until the edges are lightly golden. Keep a close eye on them to avoid overbaking.
- Cool: Allow the cookies to cool on the baking sheets for 5 minutes before transferring them to a wire rack to cool completely.
Decorate the Cookies:
- Prepare the Royal Icing: In a large bowl, beat the egg whites (or powdered egg whites and water) with a hand mixer until frothy. Gradually add the powdered sugar, continuing to beat until stiff peaks form. Add lemon juice or water to adjust the consistency to your liking. Divide the icing into several bowls and color each portion with gel food coloring (red, black, white, and pink for Minnie and Mickey designs).
- Pipe the Icing: Once the cookies have cooled, use a piping bag fitted with small tips to outline and flood the cookies with royal icing. Start with the white icing to create the base for Mickey and Minnie’s faces, and then use black for their ears, red for Minnie’s bow, and pink for accents. Allow the cookies to dry completely before serving or packaging them.
- Prep Time: 45minutes
Nutrition
- Serving Size: 16
- Calories: 200
- Fat: 8g
- Carbohydrates: 25g
- Protein: 2g
Conclusion: Valentine’s Day Pinwheel Cookies
Valentine’s Day Pinwheel Cookies are a delightful and festive treat perfect for celebrating love and friendship. Their beautiful swirl design and buttery, melt-in-your-mouth texture will have everyone asking for seconds. Whether you’re baking them for a special someone, as a gift, or for a party, these cookies are sure to make your Valentine’s Day extra sweet. Easy to make, customizable, and delicious, they’ll quickly become a favorite holiday tradition. Enjoy!