


Discover the Kitchen Tool Everyone Is Raving About!
- • Precision Engineered: Sharp blade with durable craftsmanship.
- • Comfort First: Ergonomic design for effortless slicing.
- • Stylish & Strong: Elegant wood handle meets stainless steel strength.
- • Risk-Free Pick: Thousands of happy home chefs can’t be wrong.
- • Today’s Deal: Just $29.95 instead of $99.85 — limited-time offer!
This post may include affiliate links — learn more here .
Introduction
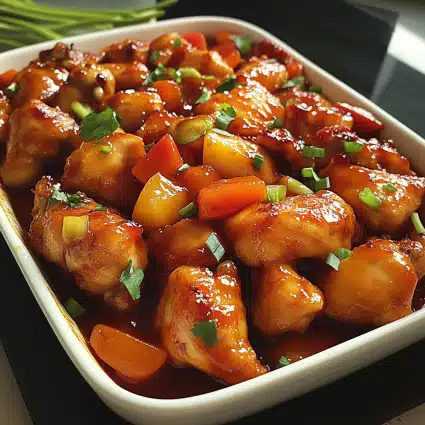
There’s something so satisfying about a plate of sweet and sour chicken, right? The crispy, golden chicken paired with a tangy, flavorful sauce that perfectly balances sweet and sour—it’s a dish that has the ability to transport you to your favorite Chinese takeout spot, but with the convenience of making it right in your own kitchen. And the best part? This recipe is oven-baked, which means you get all that crispy goodness without the mess of deep frying.
I first stumbled upon this oven-baked sweet and sour chicken recipe during one of those evenings where I was craving something comforting but didn’t want to deal with the hassle of frying. Let’s be real, deep frying at home isn’t exactly the easiest thing to manage (not to mention the mess!). This oven-baked version has become a weeknight staple in my house, and I’m confident it’ll become a favorite in yours too. It’s one of those recipes that’s simple enough to throw together on a busy weeknight but still feels like a treat. Plus, it’s a hit with everyone in my family—from picky eaters to my partner who claims they’re “not a fan of sweet and sour.” Guess what? He was converted on the first bite.
This sweet and sour chicken is crunchy on the outside, juicy on the inside, and smothered in a luscious, homemade sweet and sour sauce that strikes the perfect balance between tangy, sweet, and savory. Best of all, it’s so easy to make! So, let’s get into it. I promise you’ll love this simple twist on a classic comfort food dish.
Why You’ll Love This Recipe
- Super Easy to Make: You won’t need any fancy kitchen tools for this recipe. With just a few simple ingredients and your trusty oven, you’re all set.
- Healthier Option: Since this chicken is baked and not deep-fried, you can enjoy all the crispy goodness without the extra calories and grease. It’s the perfect balance of comfort food without the guilt.
- Family-Friendly: My kids absolutely love this dish, and it’s become a weekly favorite in our household. The sweet and sour sauce is totally customizable, so you can adjust the level of sweetness or tanginess based on your family’s preferences.
- Crispy on the Outside, Tender on the Inside: The breading on the chicken gets crispy in the oven, while the chicken stays tender and juicy. It’s the perfect texture combo.
- Customizable Sauce: The homemade sweet and sour sauce is made with ingredients you likely already have in your pantry, and it’s totally customizable. Want it sweeter? Add a bit more sugar. Prefer it tangier? Just add a little more vinegar.
Preparation Time and Servings
- Total Time: 45 minutes
- Prep Time: 15 minutes
- Cook Time: 30 minutes
- Servings: 4 servings
Nutrition Facts (per serving):
Calories: 400
Protein: 28g
Carbs: 45g
Fat: 12g
Ingredients
For the Chicken:
- 1 lb boneless, skinless chicken breast (cut into bite-sized cubes)
- 1 cup all-purpose flour
- 2 large eggs
- 1/2 cup cornstarch
- 1 teaspoon salt
- 1/2 teaspoon black pepper
- 1/2 teaspoon garlic powder
- 1/2 teaspoon onion powder
- 1/4 cup vegetable oil (for brushing)
For the Sweet and Sour Sauce:
- 1/2 cup ketchup
- 1/3 cup apple cider vinegar
- 1/2 cup brown sugar (packed)
- 1/4 cup soy sauce (use low-sodium if you prefer)
- 1 tablespoon cornstarch mixed with 2 tablespoons water (for thickening)
- 1 teaspoon fresh grated ginger (optional, but adds a nice zing)
- 1 tablespoon pineapple juice (for an extra fruity sweetness)
For Garnishing (optional):
- Sesame seeds
- Sliced green onions
Step-by-Step
 Instructions
Step 1: Preheat the Oven
First things first, go ahead and preheat your oven to 400°F (200°C). This high temperature is key to achieving the crispy chicken without the deep-frying mess. Place a baking sheet lined with parchment paper or a silicone baking mat on the rack.
Step 2: Prepare the Chicken
- Cut the chicken: Cut the boneless, skinless chicken breasts into bite-sized cubes. This size ensures the chicken cooks quickly and evenly.
- Season the chicken: In a shallow dish, combine the flour, cornstarch, salt, pepper, garlic powder, and onion powder. Mix it together to make sure all the dry ingredients are well distributed.
- Dredge the chicken: In another shallow bowl, whisk the eggs. Dip each piece of chicken into the egg wash and then coat it with the flour mixture, pressing lightly to ensure the breading sticks. You want the chicken pieces to be fully coated in the crispy, golden flour mixture.
Step 3: Bake the Chicken
- Arrange the breaded chicken pieces in a single layer on the prepared baking sheet. Be sure not to crowd the pieces; leave a little space between each so they can bake evenly and get nice and crispy.
- Brush with oil: Lightly brush the top of the chicken with vegetable oil to help with that golden crispiness.
- Bake: Place the chicken in the preheated oven and bake for 20-25 minutes, or until the chicken is fully cooked through (you can check with a meat thermometer; it should read 165°F). You’ll know the chicken is ready when the breading turns golden brown and crispy.
Step 4: Make the Sweet and Sour Sauce
- While the chicken is baking, it’s time to whip up the sweet and sour sauce. In a medium saucepan, combine ketchup, apple cider vinegar, brown sugar, and soy sauce. Stir over medium heat until the sugar is dissolved and the sauce starts to bubble.
- In a small bowl, mix cornstarch with water to create a slurry. Pour the slurry into the simmering sauce, stirring constantly until the sauce thickens (this should only take about 2-3 minutes). Once thickened, add pineapple juice and grated ginger (if using) for that extra zingy flavor. Let the sauce simmer for another minute, then remove from heat.
Step 5: Combine Chicken and Sauce
Once your chicken is baked to crispy perfection, take it out of the oven and transfer the chicken to a large mixing bowl. Pour the sweet and sour sauce over the chicken, tossing gently to coat every piece in that sticky, tangy goodness. Be careful not to break the chicken apart as you mix it—just a gentle toss will do the trick.
Step 6: Garnish and Serve
Once everything is mixed together, transfer the chicken to a serving dish. You can sprinkle it with sesame seeds and top with sliced green onions for a little extra flavor and crunch.
How to Serve
- Serve over rice: This sweet and sour chicken pairs perfectly with a bowl of fluffy, steamed white rice. The rice soaks up the extra sauce, making every bite delicious.
- Add some veggies: Serve with a side of sautéed vegetables like bell peppers, broccoli, or snap peas for a well-rounded meal.
- Pair with a salad: A simple green salad with a light vinaigrette makes a refreshing contrast to the rich, tangy chicken.
- Wrap it up: You can also serve the chicken in wraps or lettuce cups for a fun, handheld meal.
Additional Tips
- Coat your chicken thoroughly: Be sure the chicken is fully coated in the flour mixture. This helps create that crispy, crunchy texture you’re going for.
- Don’t skip the oil: Even though we’re baking the chicken, brushing it with oil ensures the coating crisps up nicely. It’s a key step!
- Adjust the sweetness: If you prefer a sweeter sauce, feel free to add a little more sugar. On the flip side, if you like your sweet and sour with more of a tang, add a bit more vinegar.
- Baking sheet tip: To make sure your chicken cooks evenly, don’t crowd the pieces on the baking sheet. Give them space to crisp up!
- Leftover sauce: If you have extra sauce, store it in an airtight container in the fridge. It’s great for dipping or as a marinade for other meats.
Recipe Variations
- Make it spicier: Add some red pepper flakes or a little sriracha to the sweet and sour sauce for a spicy kick.
- Vegetarian option: Swap out the chicken for tofu or tempeh if you’re looking for a vegetarian version. Be sure to press the tofu to remove excess moisture before breading and baking.
- Add fruit: For an extra tropical twist, toss in some pineapple chunks or mango pieces to the sauce. It adds a fresh burst of sweetness.
Serving Suggestions
- Side Dishes: Serve with steamed broccoli, roasted veggies, or a simple cucumber salad for a well-balanced meal.
- Drinks: For a refreshing beverage, pair with iced tea or a crisp, citrusy lemonade.
Freezing and Storage
- Storing: Leftover sweet and sour chicken can be stored in an airtight container in the fridge for up to 3 days.
- Freezing: You can freeze the cooked chicken by placing it on a baking sheet to freeze individually before transferring to a freezer-safe container. It will keep for up to 3 months. Reheat in the oven at 350°F for 15-20 minutes or until heated through.
Special Equipment
- Baking Sheet: A rimmed baking sheet works best to catch any drips of sauce and prevent messes in the oven.
- Wire Rack: If you have one, placing your chicken on a wire rack ensures even cooking and helps the breading stay crispy all around.
FAQ Section
- Can I use boneless chicken thighs?
Yes, you can! Chicken thighs will make the dish a little juicier and more flavorful, so feel free to use them instead of breasts. - Can I skip the cornstarch in the sauce?
You can, but it helps thicken the sauce and gives it that glossy finish. If you don’t have cornstarch, you could use arrowroot powder as a substitute. - How do I make this gluten-free?
For a gluten-free version, substitute the flour with a gluten-free all-purpose flour blend and use gluten-free breadcrumbs for the coating.
Conclusion
This oven-baked sweet and sour chicken recipe is a total winner in my household, and I’m sure it’ll be in yours too. With its crispy chicken and tangy homemade sauce, it’s the perfect dish for any night of the week—whether you’re feeding the family or serving it up at a casual gathering. Don’t forget to leave a comment below and let me know how it turns out for you! And if you make it, snap a photo and tag me on Instagram—I’d love to see your sweet and sour creations!