

Discover the Kitchen Tool Everyone Is Raving About!
- • Precision Engineered: Sharp blade with durable craftsmanship.
- • Comfort First: Ergonomic design for effortless slicing.
- • Stylish & Strong: Elegant wood handle meets stainless steel strength.
- • Risk-Free Pick: Thousands of happy home chefs can’t be wrong.
- • Today’s Deal: Just $29.95 instead of $99.85 — limited-time offer!
This post may include affiliate links — learn more here .
Introduction
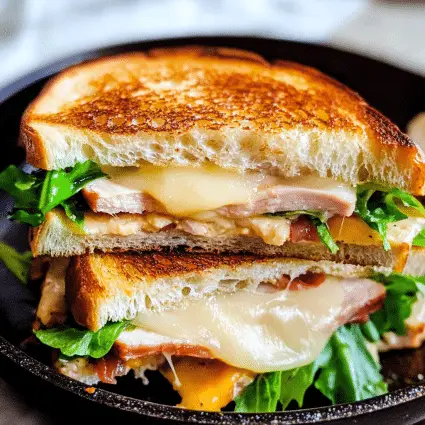
There’s just something about a turkey melt that screams comfort, isn’t there? Maybe it’s the warm, gooey cheese, or the crispy, buttery bread—whatever it is, it’s the kind of sandwich you crave when you want something that feels like a cozy hug. These Pan Turkey Melts are everything you love about a classic turkey sandwich, but with a melty, crispy twist that makes them irresistibly good. Plus, the best part? You can whip them up in less time than it takes to figure out what’s for dinner.
I first stumbled upon turkey melts when I was trying to use up leftover turkey from Thanksgiving (because, let’s face it, turkey sandwiches can get a little old after a while). But after that first bite of buttery, crispy perfection, I knew I had found something special. The combination of thinly sliced turkey, melted cheese, and a crispy, golden crust has become a staple in my household. It’s the kind of recipe that’s perfect for a lazy weekend brunch or a quick weeknight dinner that everyone will love.
In this article, I’ll guide you through making the most delicious, satisfying Pan Turkey Melts. They’re easy, customizable, and will leave you feeling like a kitchen pro. Whether you’re using leftover turkey or making it fresh, you’ll love how quick and simple it is to bring this delicious sandwich to life. So, let’s dive in and get those turkey melts sizzling on your stove!
Why You’ll Love This Recipe
This Pan Turkey Melt recipe is a must-try for so many reasons. Here’s why:
1. Easy to Make:
Whether you’re a beginner in the kitchen or a seasoned cook, this sandwich is simple to prepare. With minimal ingredients and straightforward steps, you’ll be enjoying your turkey melt in no time. And, the best part? You can easily make them with ingredients you probably already have in your pantry.
2. Perfect for Any Time of Day:
Craving a hearty lunch or dinner? This is your go-to. It’s also a great option for brunch when you’re feeling extra indulgent (because who doesn’t love a melty cheese sandwich for brunch?).
3. Full of Flavor:
The turkey is tender and flavorful, the cheese is melty and gooey, and the bread gets perfectly golden and crispy from the pan. It’s a satisfying balance of textures and flavors that will leave you coming back for more. Plus, the addition of mustard and a touch of mayo brings in the right amount of tangy richness.
4. Family-Friendly:
This recipe is a huge hit with both kids and adults. Even picky eaters will love the combination of warm turkey, melty cheese, and crispy bread. And because it’s easy to prepare, it’s a perfect recipe for a quick weeknight dinner or weekend gathering.
Preparation Time and Servings
- Total Time: 20 minutes
- Servings: 4 servings (or 2 large, hearty sandwiches)
- Nutrition Facts:
- Calories per serving: 450
- Protein: 25g
- Carbs: 35g
- Fat: 22g
Ingredients
Here’s everything you’ll need to make these mouth-watering Pan Turkey Melts:
- 8 slices of hearty bread (sourdough or whole wheat works great)
- 12 oz deli-sliced turkey breast (about 2-3 cups)
- 4 slices of cheese (Swiss, cheddar, or your favorite cheese)
- 4 tbsp unsalted butter, softened
- 2 tbsp mayonnaise
- 2 tbsp Dijon mustard (or yellow mustard, if you prefer)
- Salt and pepper, to taste
- Optional: Fresh greens (such as spinach or arugula) for extra crunch
Why These Ingredients Matter:
- Turkey: Lean, flavorful, and protein-packed. Turkey breast is the classic choice, but you can swap it with chicken or even roast beef if you want to get creative!
- Cheese: The cheese is what makes this melt melt—choose a cheese that gets nice and gooey, like Swiss or cheddar. If you like a sharp contrast, add a little provolone for some depth.
- Bread: The key here is using bread that can hold up to the heat and the melty cheese without getting soggy. Sourdough gives it a slightly tangy flavor, but a rustic whole wheat or even rye will work.
- Butter and mayo: The butter adds richness and crispiness, while the mayo (with a hint of mustard) gives the sandwich a delicious tang.
Step-by-Step
 Instructions
Let’s break it down! Follow these steps to create the perfect Pan Turkey Melt:
1. Prepare the Bread and Spread the Sauce
Start by laying out your slices of bread. You’ll need 2 slices per sandwich, so you should have 8 slices in total for 4 sandwiches. Next, grab your butter and spread a thin, even layer on one side of each slice of bread. This will give you the golden, crispy finish we’re after.
Now, on the other side of the bread (the side that will face the turkey), spread a generous amount of mayonnaise and Dijon mustard. This combo adds a rich, tangy flavor that complements the turkey beautifully.
2. Assemble the Sandwiches
Once your bread is prepped, it’s time to layer! Take the buttered side of one slice and place it down on a clean surface. Add a slice of cheese (Swiss or cheddar is perfect!) on top, followed by a generous portion of turkey breast. If you like a little extra flavor, feel free to layer on some fresh greens, like spinach or arugula. Add the second slice of cheese on top of the turkey, then close the sandwich with the second slice of buttered bread, butter side facing out.
3. Heat the Pan
Preheat a large skillet or griddle over medium heat. It’s important to get the pan hot, but not smoking. You want the bread to toast evenly without burning. A cast-iron skillet works wonderfully here if you have one, as it helps maintain an even heat distribution.
4. Cook the Sandwiches
Place the assembled sandwiches in the hot pan. Cook for about 3-4 minutes per side, pressing gently with a spatula to ensure even browning. The bread should turn golden and crispy, while the cheese should be melting perfectly inside.
If the bread is browning too quickly and the cheese isn’t melting yet, reduce the heat to medium-low and cook for an additional minute or so. Flip the sandwich carefully to avoid losing any of that glorious cheese.
5. Rest the Sandwiches
Once both sides are golden and crispy, remove the sandwiches from the pan and let them rest for 1-2 minutes. This helps the cheese settle and makes for an easier (and less messy) eating experience.
6. Slice and Serve
After the sandwiches have rested, slice them in half diagonally and serve immediately. You’ll notice how the cheese oozes out from the sides, inviting you to take that first, glorious bite.

How to Serve
These Pan Turkey Melts are perfect as a standalone meal, but you can easily turn them into a full feast with some delicious sides:
- Pair with a side salad: A simple green salad with a tangy vinaigrette complements the richness of the sandwich.
- Soup on the side: Tomato soup or a light vegetable soup makes for a comforting combo.
- Pickles or chips: A crunchy side of pickles or crispy potato chips adds a satisfying contrast.
Additional Tips
- Use Softened Butter: To ensure an even spread, make sure your butter is softened before applying it to the bread. This will help prevent any tearing or uneven buttering.
- Don’t Rush the Cooking Process: It’s tempting to cook the sandwiches at high heat to speed things up, but lower heat is key to achieving that perfectly crisp, golden crust. You want the cheese to melt slowly and thoroughly.
- Feel Free to Customize: If you’re not a fan of Dijon mustard, you can use honey mustard for a sweeter flavor or skip the mustard altogether. Add a few slices of tomato or a handful of sautéed onions to change things up.
- Add Extra Cheese: For an even cheesier experience, feel free to double the cheese layer. Extra cheese is always a win!
Recipe Variations
1. Vegetarian Option:
Swap out the turkey for grilled vegetables like zucchini, bell peppers, and eggplant. You can add a little hummus or pesto for extra flavor.
2. Gluten-Free:
Use your favorite gluten-free bread and make sure the mustard and mayo are gluten-free as well.
3. Spicy Kick:
Add a few dashes of hot sauce or a sprinkle of crushed red pepper flakes to the mayonnaise for an extra spicy punch.
4. Cheese Variety:
Try mixing different cheeses like provolone, gouda, or pepper jack for a fun, flavorful twist. Adding a mix of cheeses can create a melty, gooey experience that’s just irresistible.
Serving Suggestions
To make your Pan Turkey Melts even more delicious, serve them with these complementary sides:
- Side Salad: Try a simple arugula salad dressed with lemon vinaigrette for a fresh, light side.
- Soup Pairing: A bowl of creamy tomato soup or butternut squash soup is the perfect addition.
- Crispy Fries: If you’re craving something extra indulgent, pair your melts with crispy fries or homemade potato wedges.
Freezing and Storage
Storage:
If you have leftover sandwiches, you can store them in an airtight container in the fridge for up to 2 days. However, for the best taste, it’s best to eat them fresh.
Freezing:
You can also freeze the assembled sandwiches before cooking. Wrap each sandwich tightly in plastic wrap or aluminum foil and place them in a freezer-safe bag. When you’re ready to eat, cook them straight from the freezer on low heat, covering them with a lid to help the cheese melt.
Special Equipment
You’ll need a large skillet or griddle to cook these turkey melts, and a spatula for flipping. A cast-iron skillet is ideal for even heat distribution. If you like extra crispy sandwiches, a grill pan with ridges is a great choice. A butter knife or spoon to spread the butter evenly will also help with a smooth application.
FAQ Section
1. Can I use store-bought turkey?
Absolutely! Deli-sliced turkey works great, but if you have leftover turkey from another meal, that’s even better.
2. Can I make this ahead?
You can assemble the sandwiches a few hours ahead, but it’s best to cook them fresh. If needed, store the assembled sandwiches in the fridge and cook them right before serving.
3. Can I freeze these sandwiches?
Yes! You can freeze the sandwiches before cooking. Just be sure to wrap them tightly and cook them straight from the freezer.
4. Can I add extra vegetables?
Definitely! Add sautéed onions, tomatoes, or even spinach to elevate your turkey melt.
Conclusion
And there you have it—a simple, delicious recipe for Pan Turkey Melts that’s guaranteed to satisfy. Whether you’re using up leftovers or making them from scratch, these sandwiches are sure to be a hit with the whole family. The crispy, buttery bread, the melty cheese, and the savory turkey combine for the ultimate comfort food experience.
I can’t wait for you to try these! Be sure to let me know how they turn out by leaving a comment or tagging me on Instagram with your turkey melt creations. I love seeing how you all bring these recipes to life!